VisuaLeaf Settings & Configuration
Settings
Settings is where you manage your license, connect an AI provider, set up email notifications, choose where comparison results are stored, pick a theme and font, let an external AI assistant drive VisuaLeaf, and review crash reports. Everything lives in one dialog with a list of sections down the left side; click a section to show its options on the right, then press Save to keep your changes or Cancel to throw them away.
Quick Start
Get started with Settings:
- Click the gear icon at the bottom of the left activity bar (or run Settings from the Command Palette)
- Pick a section from the list on the left: License, AI Providers, Email, Storage, Appearance, MCP Server or Diagnostics
- Check your plan under License, and add at least one provider under AI Providers if you want AI-written queries
- Choose your theme, interface font and default result view under Appearance
- Click Save to apply your changes
Settings Sections
| Section | What it's for |
|---|---|
| License | Your plan, this computer's activation, and buttons to upgrade, enter a key or activate offline |
| AI Providers | The AI services that write queries and power the assistant |
| Notification emails sent through your own SendGrid account | |
| Storage | Where Data Compare results are saved, and the key that encrypts them |
| Appearance | Theme, interface font, the view results open in, and status bar stats |
| MCP Server | Lets an external AI assistant connect to VisuaLeaf and work in it while you watch |
| Diagnostics | Crash reports saved on this computer, and whether they are sent automatically |
On the desktop app, a General section may also appear with an Ask before quitting switch, which asks you to confirm before VisuaLeaf closes so a stray Cmd+Q doesn't stop running queries. License, MCP Server and Diagnostics are only shown in the desktop app.
License
The License section shows your plan and this computer's activation at a glance: whether the license is active, which edition you're on, the email it's registered to, this machine's name, the license key (hidden until you click the eye icon), the expiration date, and how many trial days of Pro features you have left. The refresh button next to the edition badge re-checks your license with the server.
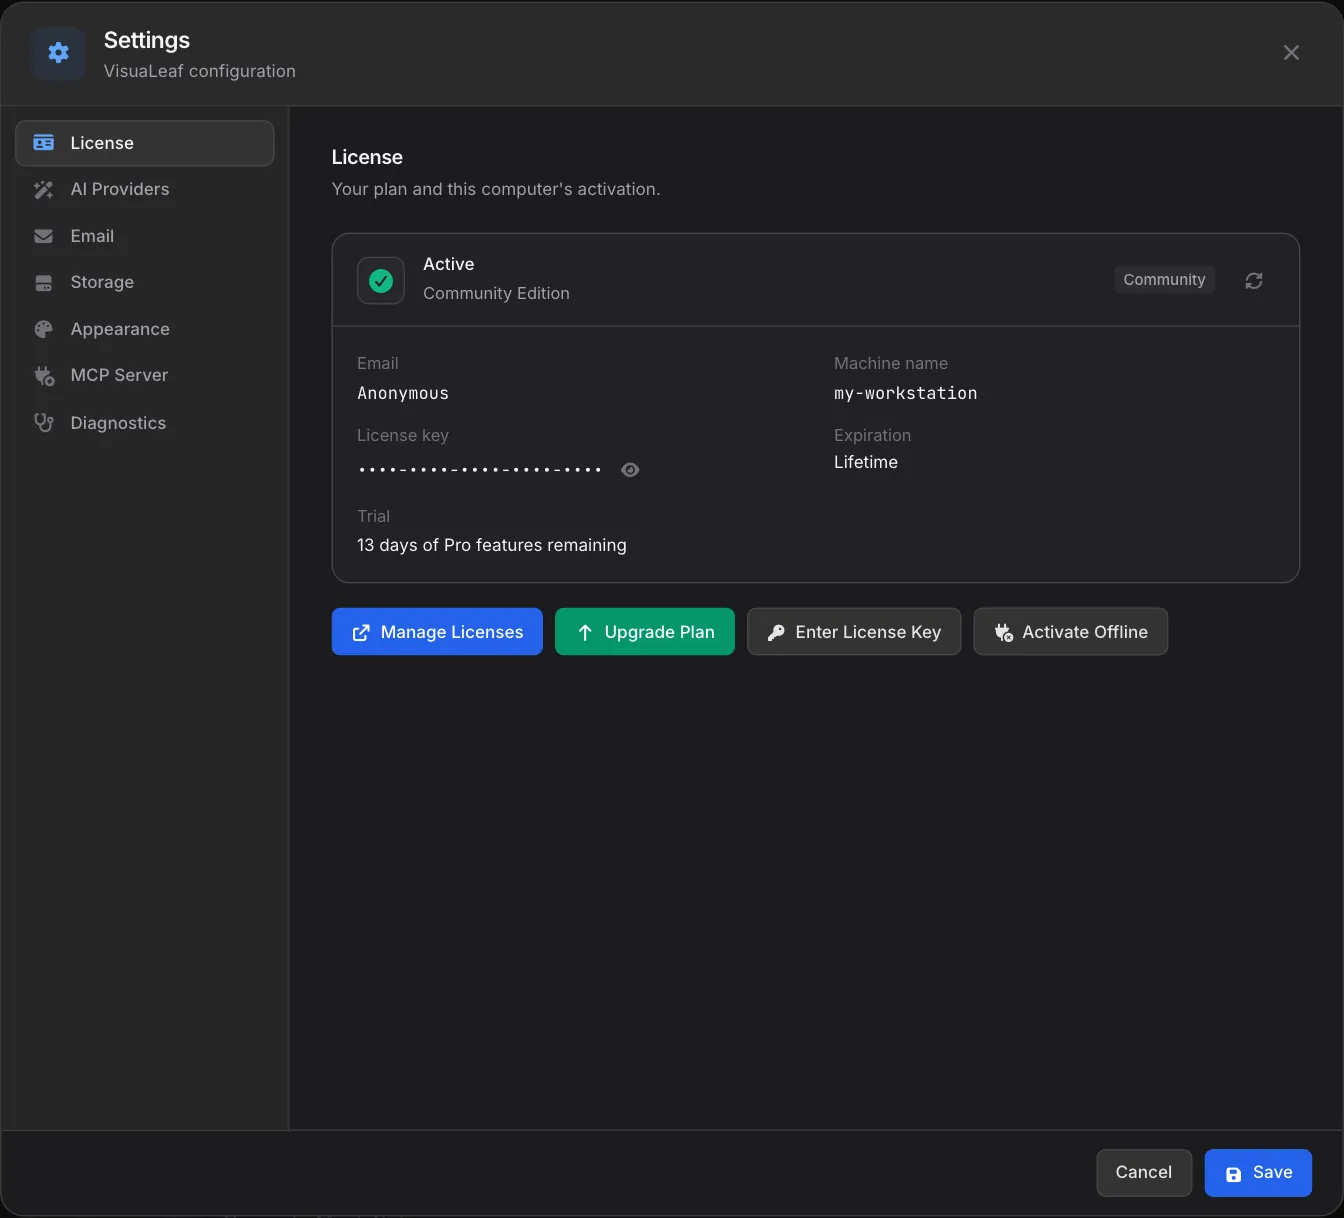
- Manage Licenses - Opens your account in the browser, where you can see and move your seats
- Upgrade Plan - Shown on the free plan; opens the pricing page so you can move to a paid edition
- Enter License Key - Paste a key you've been given to activate this computer
- Activate Offline - Activate a computer that can't reach the internet, such as one on an air-gapped network
Settings is never locked behind a license, so you can always get here to activate, even on a first launch with no connection.
AI Providers
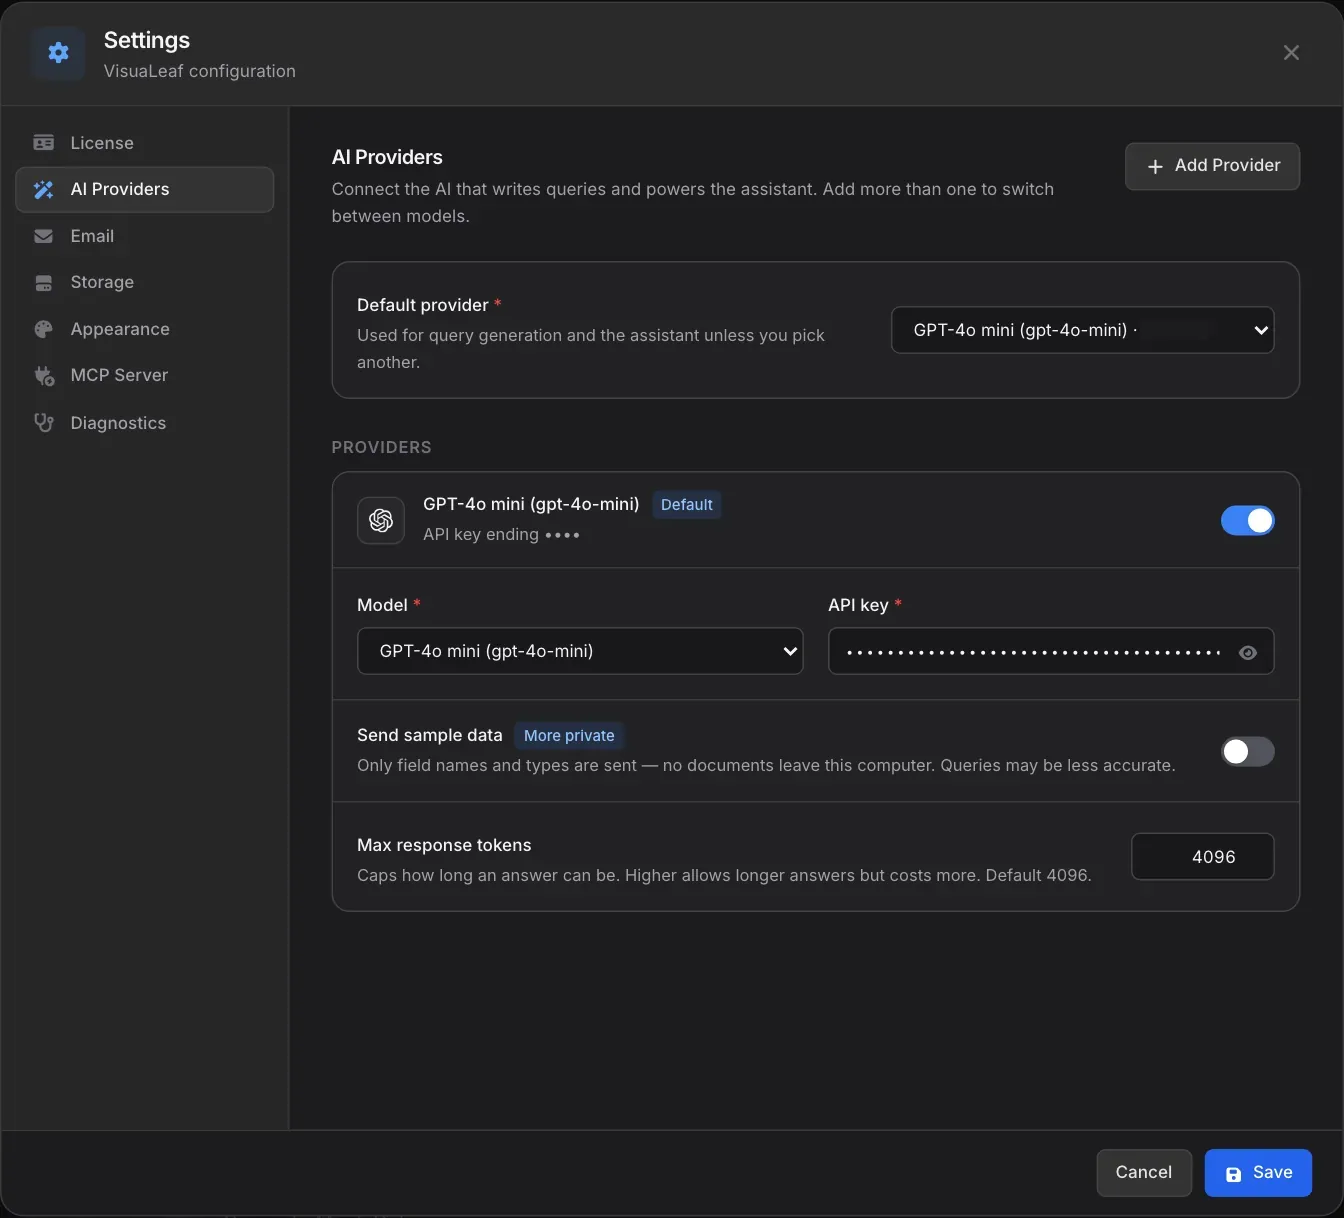
Connect the AI that writes queries for you and powers the assistant. VisuaLeaf can help you write MongoDB queries, aggregation pipelines and SQL, and explain results in plain language. You can add more than one provider and switch between them.
Adding and Managing Providers
- Add Provider - Click Add Provider at the top right to add another AI service. You can choose from OpenAI, Google Gemini, Anthropic Claude, xAI Grok, a local model through Ollama, or a custom / self-hosted endpoint
- Default provider - Pick which provider is used for query generation and the assistant unless you choose another one in the moment. Each entry shows the model and the last characters of its API key so you can tell keys apart
- On / off switch - Each provider card has a switch so you can turn a provider off without deleting it
- Default badge - The provider currently used by default is marked with a Default badge
Provider Fields
| Field | Description | Required |
|---|---|---|
| Model | The model to use from that provider, such as GPT-4o mini | Yes |
| API key | Your key for that provider. It is hidden by default; click the eye icon to show it | Yes (except local models) |
| Send sample data | Whether a few sample documents or rows are sent along with your field names to make the AI's queries more accurate | No (off by default) |
| Max response tokens | Caps how long an answer can be. Higher allows longer answers but costs more. Default 4096 | No |
Sample Data Privacy
The Send sample data switch controls what the AI provider sees:
- Off (More private) - Only field names and types are sent. No documents leave your computer. Queries may need a little more refinement because the AI can't see real values
- On (Better accuracy) - A few sample documents are sent too, so the AI understands your actual values and patterns. Best for development or non-sensitive data
Send notification emails through your own SendGrid account. Email is off until you turn on Use SendGrid; once it's on, the rest of the fields appear.
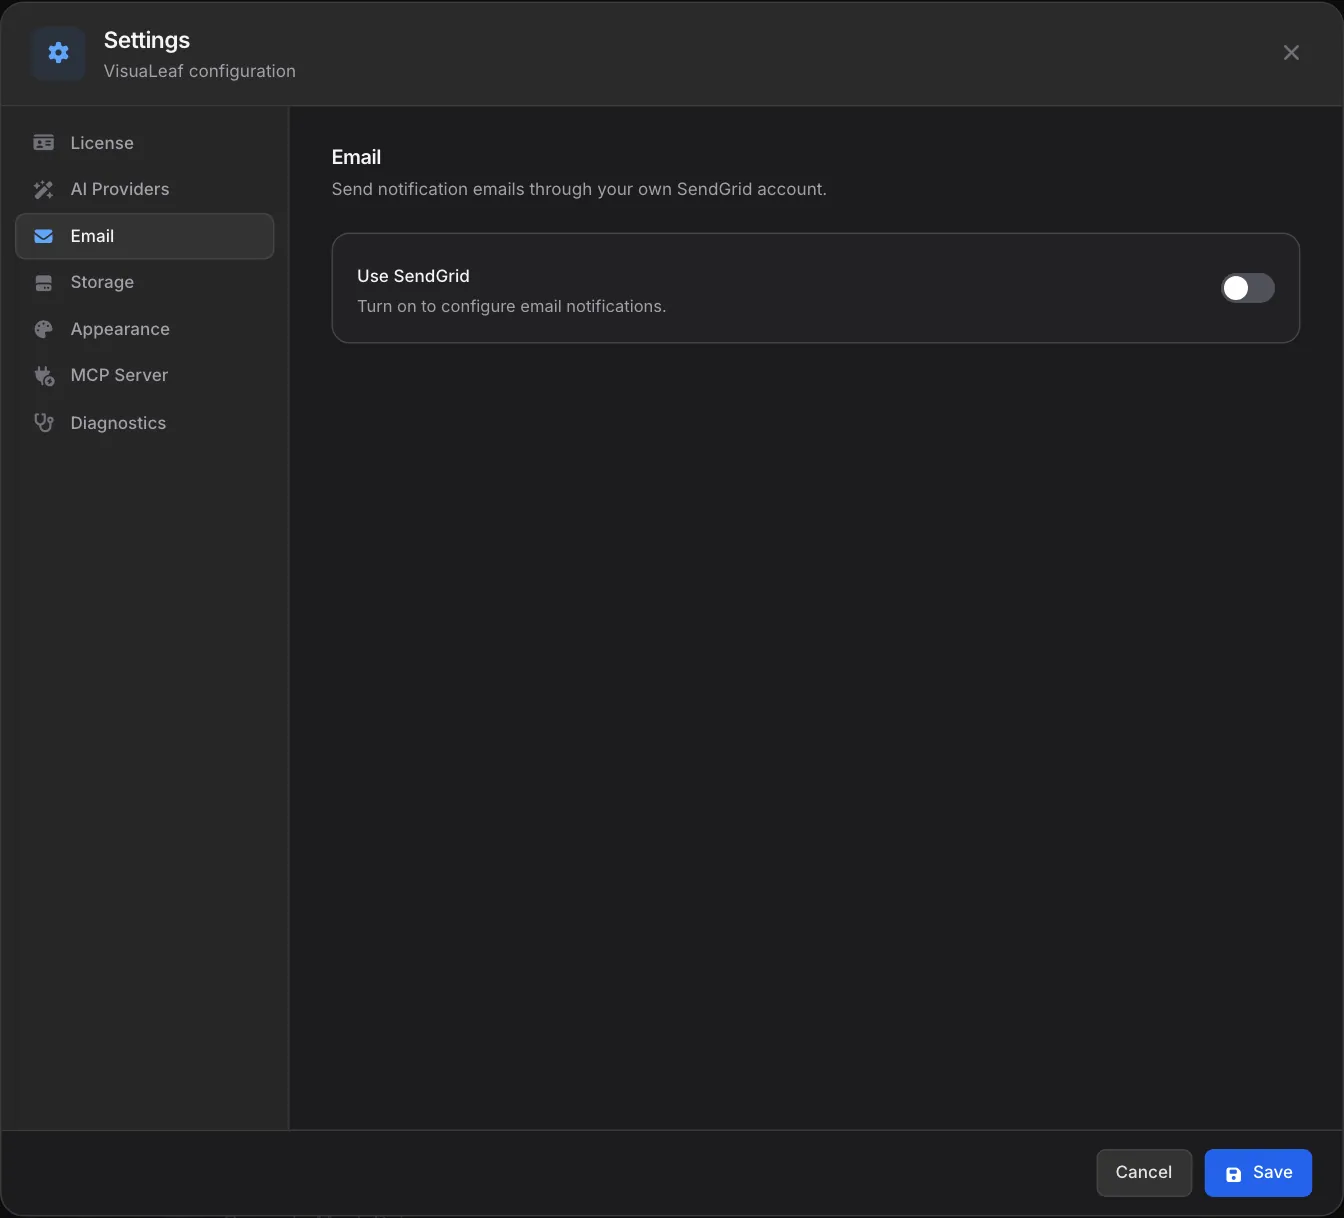
Email Fields
| Field | Description | Required |
|---|---|---|
| Use SendGrid | Turns email notifications on or off | N/A |
| API key | Your SendGrid API key (starts with "SG."). Create one in the SendGrid dashboard under Settings > API Keys | Yes, when SendGrid is on |
| From address | The email address messages are sent from. It must be verified in SendGrid | Yes, when SendGrid is on |
| Sender first name / last name | The name shown in the "From" line of the email | No |
Setting Up SendGrid
- Create a SendGrid account at sendgrid.com
- Generate an API key under Settings > API Keys with at least "Mail Send" permission, and copy it (SendGrid only shows it once)
- Verify your sender address under Settings > Sender Authentication
- Turn on Use SendGrid in VisuaLeaf, paste the key, enter the verified From address and an optional sender name
- Save and send yourself a test to make sure delivery works
Troubleshooting Email
- API key rejected: Check that the key has "Mail Send" permission and has no extra spaces
- Sender not verified: SendGrid won't send from an address you haven't verified
- Email not received: Check your spam folder and the SendGrid Activity feed
- Daily limit reached: Free SendGrid accounts have a daily sending cap
Storage
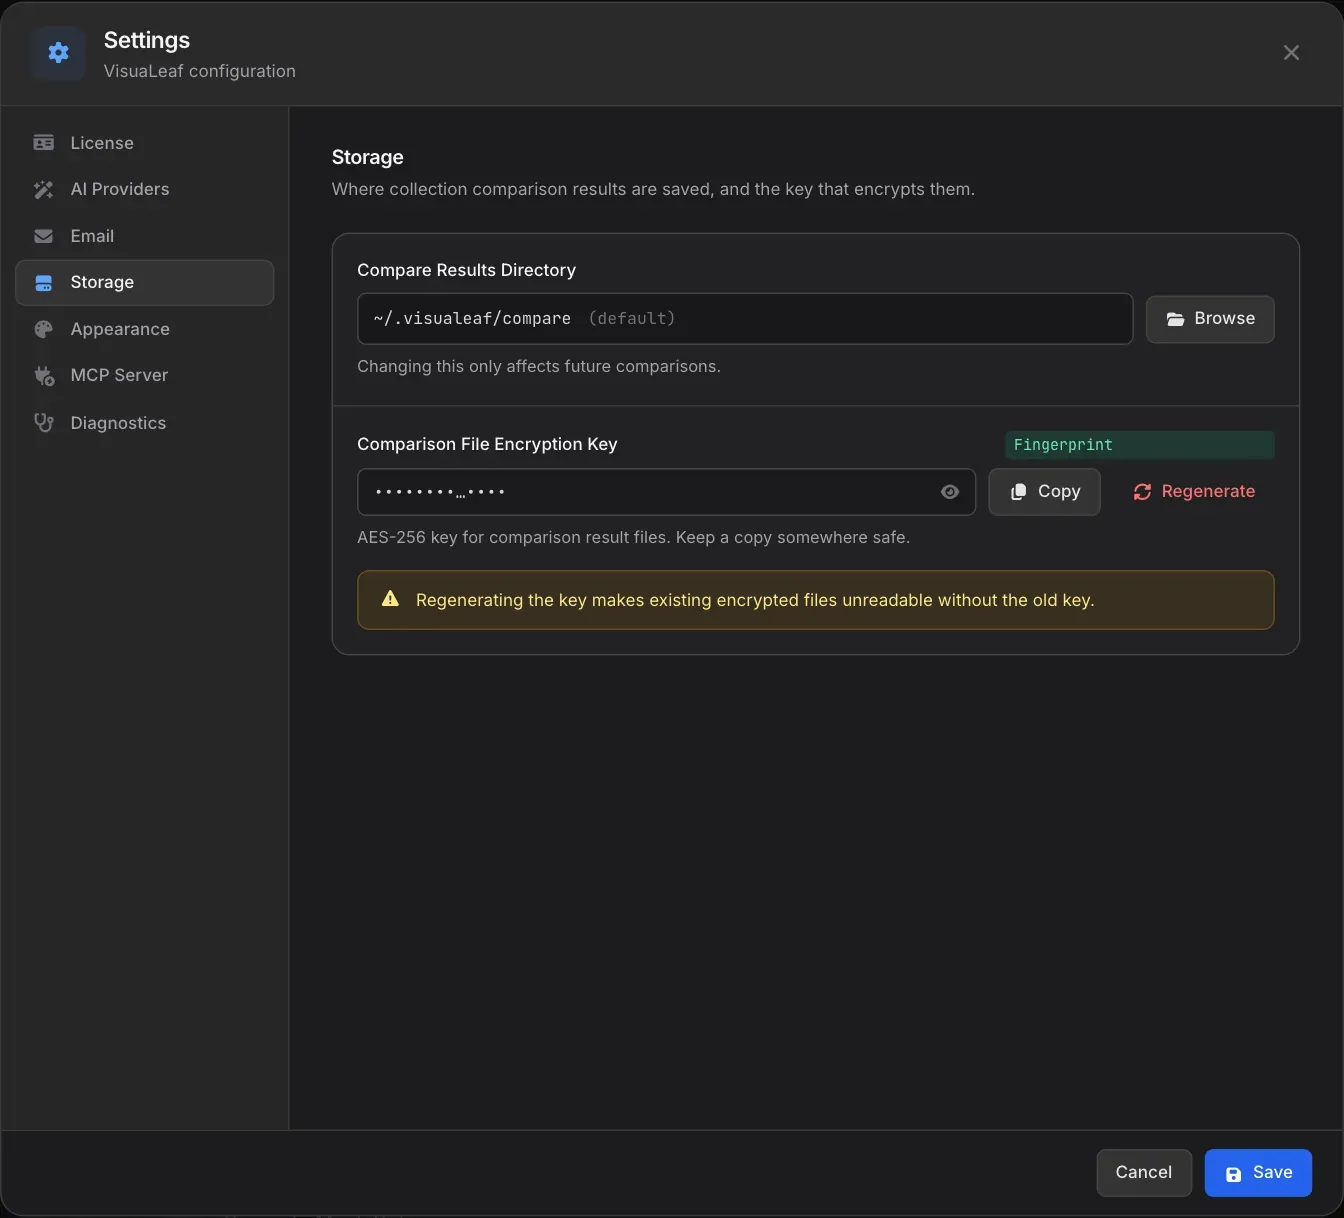
Choose where Data Compare results are saved, and manage the key that encrypts them.
Compare Results Directory
- Default location -
~/.visualeaf/comparein your home folder, marked "(default)" - Browse - Pick any folder you can write to, such as a project folder or a different drive
- Future comparisons only - Changing the folder only affects new comparisons; results you already have stay where they are
Comparison File Encryption Key
Comparison results are encrypted on disk. The key is hidden by default; use the eye icon to show it and Copy to keep a copy somewhere safe. The fingerprint next to the heading lets you check you're using the same key on another machine without revealing it.
Regenerate creates a new key. Results saved under the old key can't be opened without it, so copy the old key first if you might need those results again.
Appearance
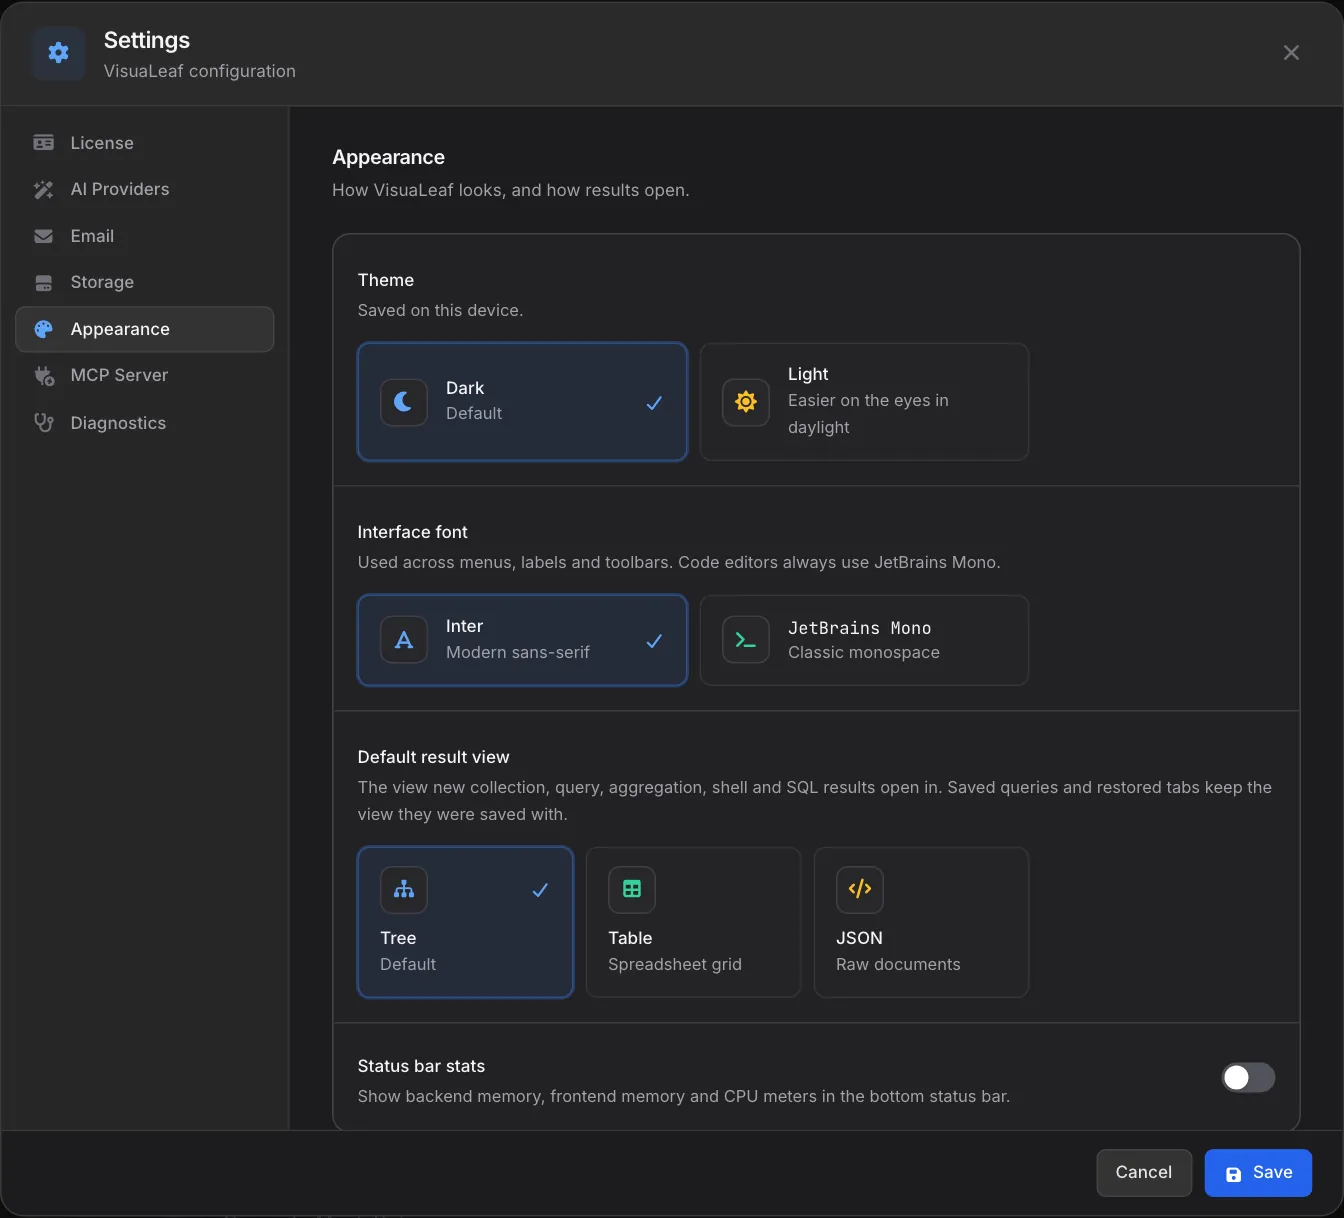
Control how VisuaLeaf looks, how results open, and which icons appear on the left and right activity bars.
Theme
Pick Dark (the default) or Light, which is easier on the eyes in daylight and when screen-sharing. The change applies right away across every tab, panel and dialog, and is saved on this device.
Interface Font
Choose the font used across menus, labels and toolbars: Inter, a modern sans-serif, or JetBrains Mono, a classic monospace. Code editors always use JetBrains Mono, whichever you pick here.
Default Result View
Choose the view that new collection, query, aggregation, shell and SQL results open in: Tree (the default), Table (a spreadsheet grid) or JSON (raw documents). Saved queries and restored tabs keep the view they were saved with.
Status Bar Stats
Turn on Status bar stats to show backend memory, frontend memory and CPU meters in the bottom status bar. It's off by default.
Sidebar Icons
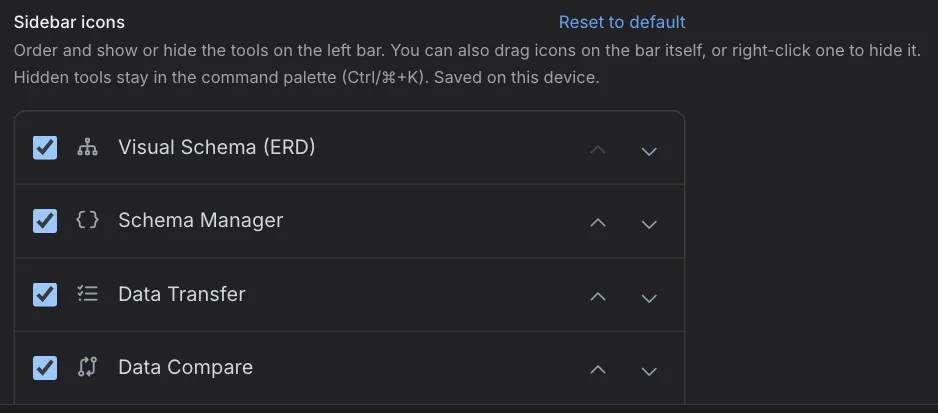
Choose which tools appear on the left activity bar, and in what order. Each tool — Visual Schema (ERD), Schema Manager, Data Transfer, Data Compare, Data Sync, Query Profiler and User Management — has a checkbox to show or hide it and up/down arrows to move it. Reset to default restores the original set and order.
You can make the same changes on the bar itself: drag icons to reorder them, or right-click one to hide it. Hidden tools stay available in the Command Palette (Ctrl+K / ⌘+K). Your choices are saved on this device.
Right Sidebar Shortcuts
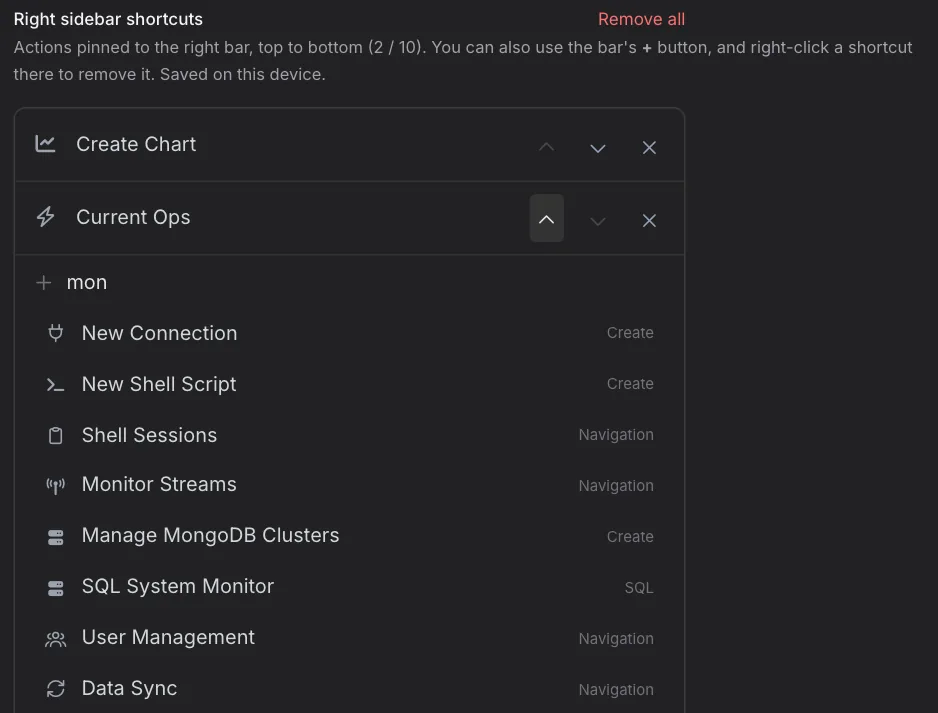
Manage the shortcuts pinned to the right activity bar. The list shows your shortcuts top to bottom and how many of the 10 slots you've used.
- Add — type in the search row under the list and click an action to pin it.
- Reorder — use the up/down arrows next to a shortcut.
- Remove — click × next to a shortcut, or Remove all to clear the bar.
You can also add shortcuts with the + button on the right bar, and right-click a shortcut there to remove it. Shortcuts are saved on this device.
MCP Server
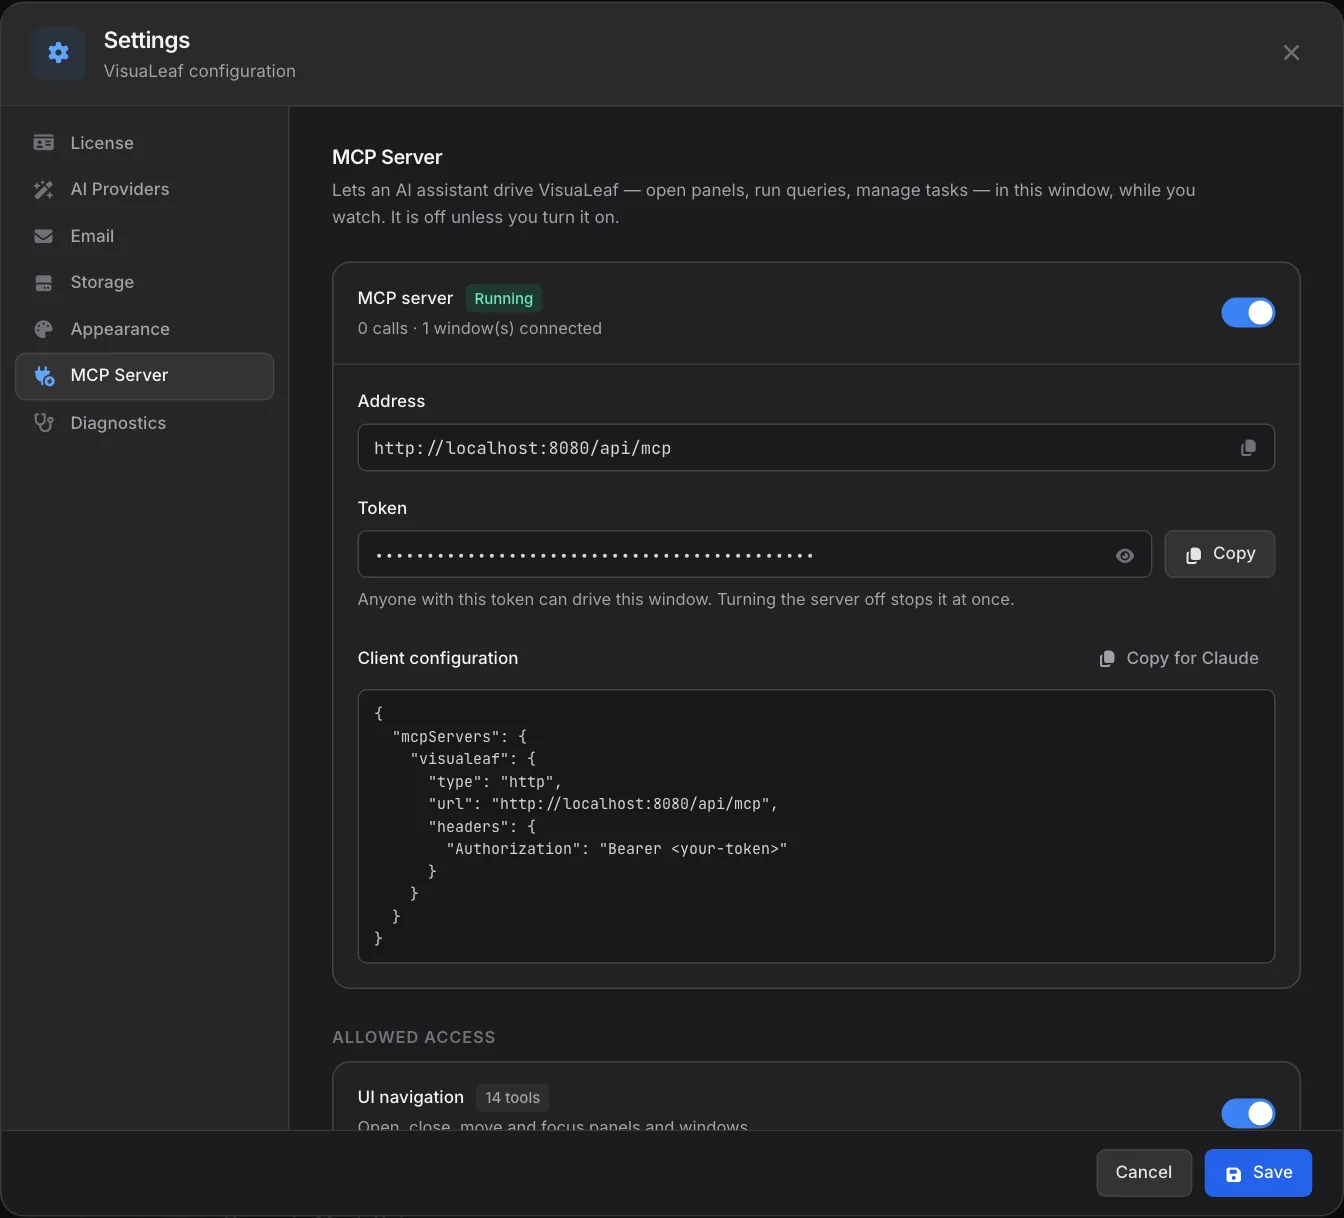
The MCP Server lets an external AI assistant, such as Claude or another tool that speaks the Model Context Protocol (MCP), connect to VisuaLeaf and drive it: open panels, run queries, manage tasks and more, in this window, while you watch. It is off unless you turn it on, and you can also switch it on or off from the MCP button in the status bar.
Connecting an AI Assistant
- Turn on the MCP server switch. A Running badge appears, along with how many calls it has handled and how many VisuaLeaf windows are connected
- Copy the Address and Token, or click Copy for Claude to copy a ready-made client configuration
- Paste the configuration into your AI assistant's MCP settings
- Ask the assistant to do something in VisuaLeaf; you'll see it happen in the window
Keep the token private. Anyone with it can drive this window. Turning the server off stops access at once, and the status bar shows when the server is running.
Allowed Access
Under Allowed access, each group of actions has its own switch and shows how many tools it includes, so you can let an assistant navigate and read without letting it change or delete anything:
- UI navigation - Open, close, move and focus panels and windows
- Read data - Run queries in panels and read the rows they return
- Connections - List connections, open sessions, and fill in the New Connection form for you to save
- Tasks — read / Tasks — modify - See tasks and run history, or create, edit, schedule and delete them
- Charts and ER diagrams - Create, run, edit and delete saved charts and diagrams
- Files - List and read files in your storage
- Data Compare / Compare — apply differences - Compare collections, or also write the differences into the target
- Appearance - Change the theme, interface font and other display settings
Diagnostics
If VisuaLeaf's database engine stops unexpectedly, a crash report is saved on this computer. A report holds the error and a short log excerpt; passwords, server and database names, data values, email addresses and your user name are removed before anything is sent.
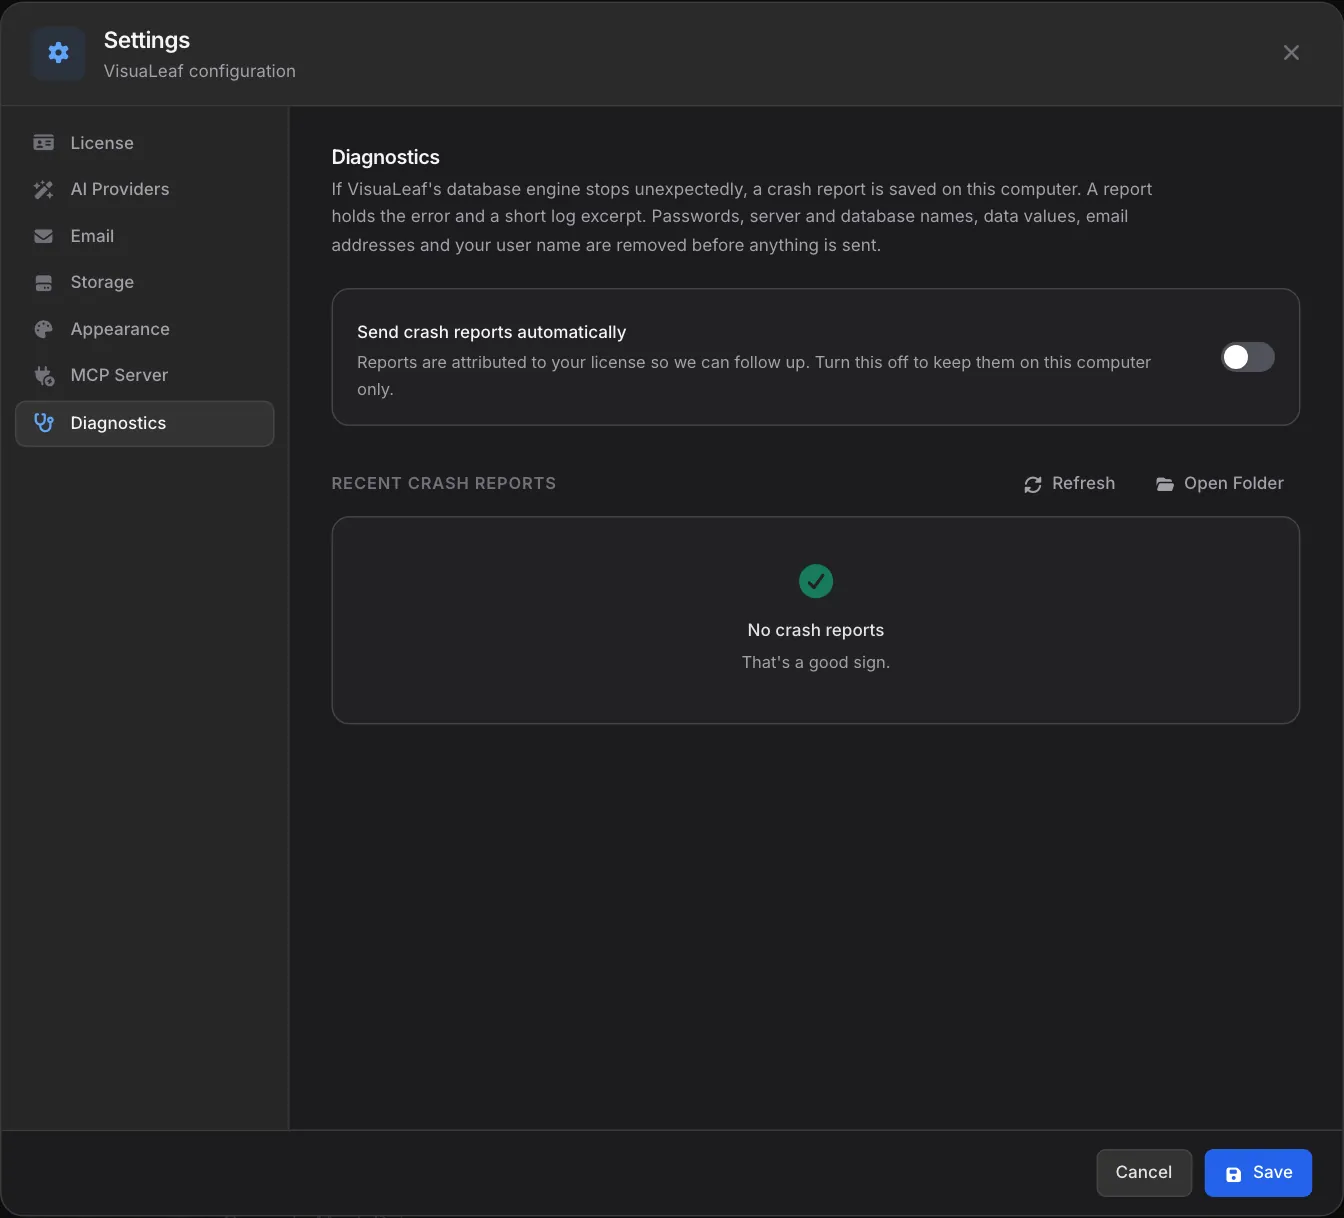
- Send crash reports automatically - When on, reports are sent and attributed to your license so the team can follow up. Leave it off to keep them on this computer only
- Recent crash reports - Lists saved reports with the time and whether each was sent or kept local
- Refresh / Open Folder - Reload the list, or open the folder that holds the reports so you can attach one to a support request
Saving Your Changes
Changes made in the dialog aren't applied until you click Save at the bottom right. Cancel or the close button discards them. A few switches take effect immediately, such as turning the MCP server on or off and choosing whether crash reports are sent.
Required Fields
- AI Providers: Each provider that's switched on needs a model and an API key, and a default provider must be selected
- Email: When SendGrid is on, the API key and a valid From address are required
- Required fields are marked with a red asterisk; Save stays disabled until they are filled in
Pro Tips
- Mix providers: Add a fast, low-cost model as your default and a more capable one for complex queries, then switch between them as needed.
- Privacy vs. accuracy: Keep Send sample data off for production data. Turn it on for development data to get more accurate queries.
- Back up your encryption key: Copy the comparison encryption key somewhere safe before regenerating it or moving to a new machine.
- Limit what an assistant can do: When trying the MCP Server for the first time, leave only UI navigation and Read data on, and turn on the groups that change things once you're comfortable.
- Pick your default view once: If you mostly work in grids, set the default result view to Table so every new result opens that way.
- Test email first: After setting up SendGrid, send yourself a test before relying on it for notifications.
Related Features
- Collection Activity - Use AI assistance to write queries and filters for collection browsing with natural language prompts
- Aggregation Pipeline - AI can help construct complex aggregation pipelines by understanding your requirements in plain English
- MongoDB Shell - Get AI suggestions for MongoDB shell commands and query syntax
- Data Compare - Compare collections and save results to the configured storage directory for later review
- Status Bar - See save status, the MCP server indicator and optional memory and CPU meters
- Export Data - Configure SendGrid to receive email notifications when long-running export jobs complete
Ready to try VisuaLeaf?
Download and start managing your MongoDB and SQL databases with ease.
Download Free Trial