Aggregation Pipeline in MongoDB: A Practical Guide for Developers


“Aggregation pipeline” may seem to be an intimidating term, but actually, it is just an approach to processing documents from MongoDB one by one in a small batch rather than executing everything in one big query.
For instance:
1. Keep only the documents you need with $match.
2. Organize related documents with $group.
3. Choose or reshape fields with $project.
4. Order the final results with $sort.
To summarize:
$match → $group → $project → $sort
Every stage operates on the output of the previous stage, and one can include only those stages which are required for the query execution.
This guide will help you to learn step-by-step how to create a MongoDB aggregation pipeline, to explore the most helpful stages of this pipeline, and how a visual builder can help you with long and complex pipelines.
What Is a MongoDB Aggregation Pipeline?
A MongoDB aggregation pipeline is a series of stages that process documents in order. Each stage receives the output of the previous stage, changes it in some way, and passes the result forward.
The simplest pipeline could be like this:
db.orders.aggregate([
  {
    $match: {
      status: "completed"
    }
  },
  {
    $group: {
      _id: "$customerId",
      totalSpent: { $sum: "$total" },
      orderCount: { $sum: 1 }
    }
  },
  {
    $sort: {
      totalSpent: -1
    }
  }
])
This pipeline:
1. Finds completed orders.
2. Groups them by customer.
3. Calculates the total amount and number of orders.
4. Sorts customers from the highest to the lowest spender.
Thinking of the pipeline as a sequence of small transformations makes it easier to understand. Instead of trying to solve everything at once, you can check what happens after each stage.
Common Aggregation Pipeline MongoDB Stages
MongoDB provides many aggregation stages, but application developers usually rely on a smaller group for most everyday tasks.
$match filters documents
The $match stage works similarly to the filter used with find(). It should usually appear as early as possible so that later stages process fewer documents.
{
  $match: {
    status: "completed",
    createdAt: {
      $gte: ISODate("2026-01-01")
    }
  }
}
When the filtered fields are indexed, MongoDB may be able to use those indexes to reduce the amount of work required.
$project selects or reshapes fields
Use $project when you only need certain fields or want to calculate new values.
{
  $project: {
    customerId: 1,
    total: 1,
    year: { $year: "$createdAt" }
  }
}
Removing unnecessary fields can also make intermediate results easier to inspect.
$group calculates summaries
The $group stage is useful for totals, averages, counts, minimums, and maximums.
{
  $group: {
    _id: "$category",
    averagePrice: { $avg: "$price" },
    productCount: { $sum: 1 }
  }
}
Remember that $group changes the shape of the output. Fields that existed before the stage will not remain available unless you include them through an accumulator.
$sort orders the results
The $sort stage arranges documents by one or more fields.
{
  $sort: {
    averagePrice: -1
  }
}
Sorting large result sets can be expensive. Filter early and avoid carrying unnecessary data into the sorting stage.
$lookup joins related collections
MongoDB is not a relational database, but $lookup can combine documents from different collections.
{
  $lookup: {
    from: "customers",
    localField: "customerId",
    foreignField: "_id",
    as: "customer"
  }
}
The matching documents are returned as an array. If you expect one related document, you may follow $lookup with $unwind.
$unwind expands array values
The $unwind stage creates a separate output document for each item in an array.
{
  $unwind: "$items"
}
Be careful with large arrays. Unwinding 1,000 documents that each contain 20 items can produce up to 20,000 intermediate documents.
Did you know you can build MongoDB aggregation pipelines without writing any code?
Build Pipelines One Stage at a Time
A common mistake is writing a complete pipeline before running it. If the result is incorrect, you then have to search through every stage to find the problem.
A more reliable approach is to build and test the pipeline gradually.
Start with a small filter:
db.orders.aggregate([
  {
    $match: {
      status: "completed"
    }
  }
])
Check the returned documents and confirm that the expected fields and data types are present. Then add the next stage:
db.orders.aggregate([
  {
    $match: {
      status: "completed"
    }
  },
  {
    $unwind: "$items"
  }
])
Continue until the pipeline is complete. This approach gives you a clear point at which the results changed unexpectedly.
A visual aggregation builder can make this process easier because you can add, reorder, enable, or disable stages while inspecting the output. VisuaLeaf, for example, lets developers create pipelines stage by stage and preview the results from the same workspace. You can still switch to the integrated MongoDB Shell whenever you need direct control over the final query.
How to Build a MongoDB Aggregation Pipeline Visually
Writing an aggregation pipeline manually gives you complete control, but it can be difficult to follow how the documents change from one stage to the next.
A visual aggregation pipeline builder lets you add and configure each stage separately. For example, you could:
- Add
$matchto keep only completed orders. - Add
$groupto calculate total spending per customer. - Add
$sortto display the highest-spending customers first. - Preview the results and adjust individual stages when something looks wrong.
In VisuaLeaf, you can build the pipeline stage by stage while browsing the collection and checking the results in the same workspace. This makes it easier to spot incorrect field names, unexpected data types, or a stage placed in the wrong order.
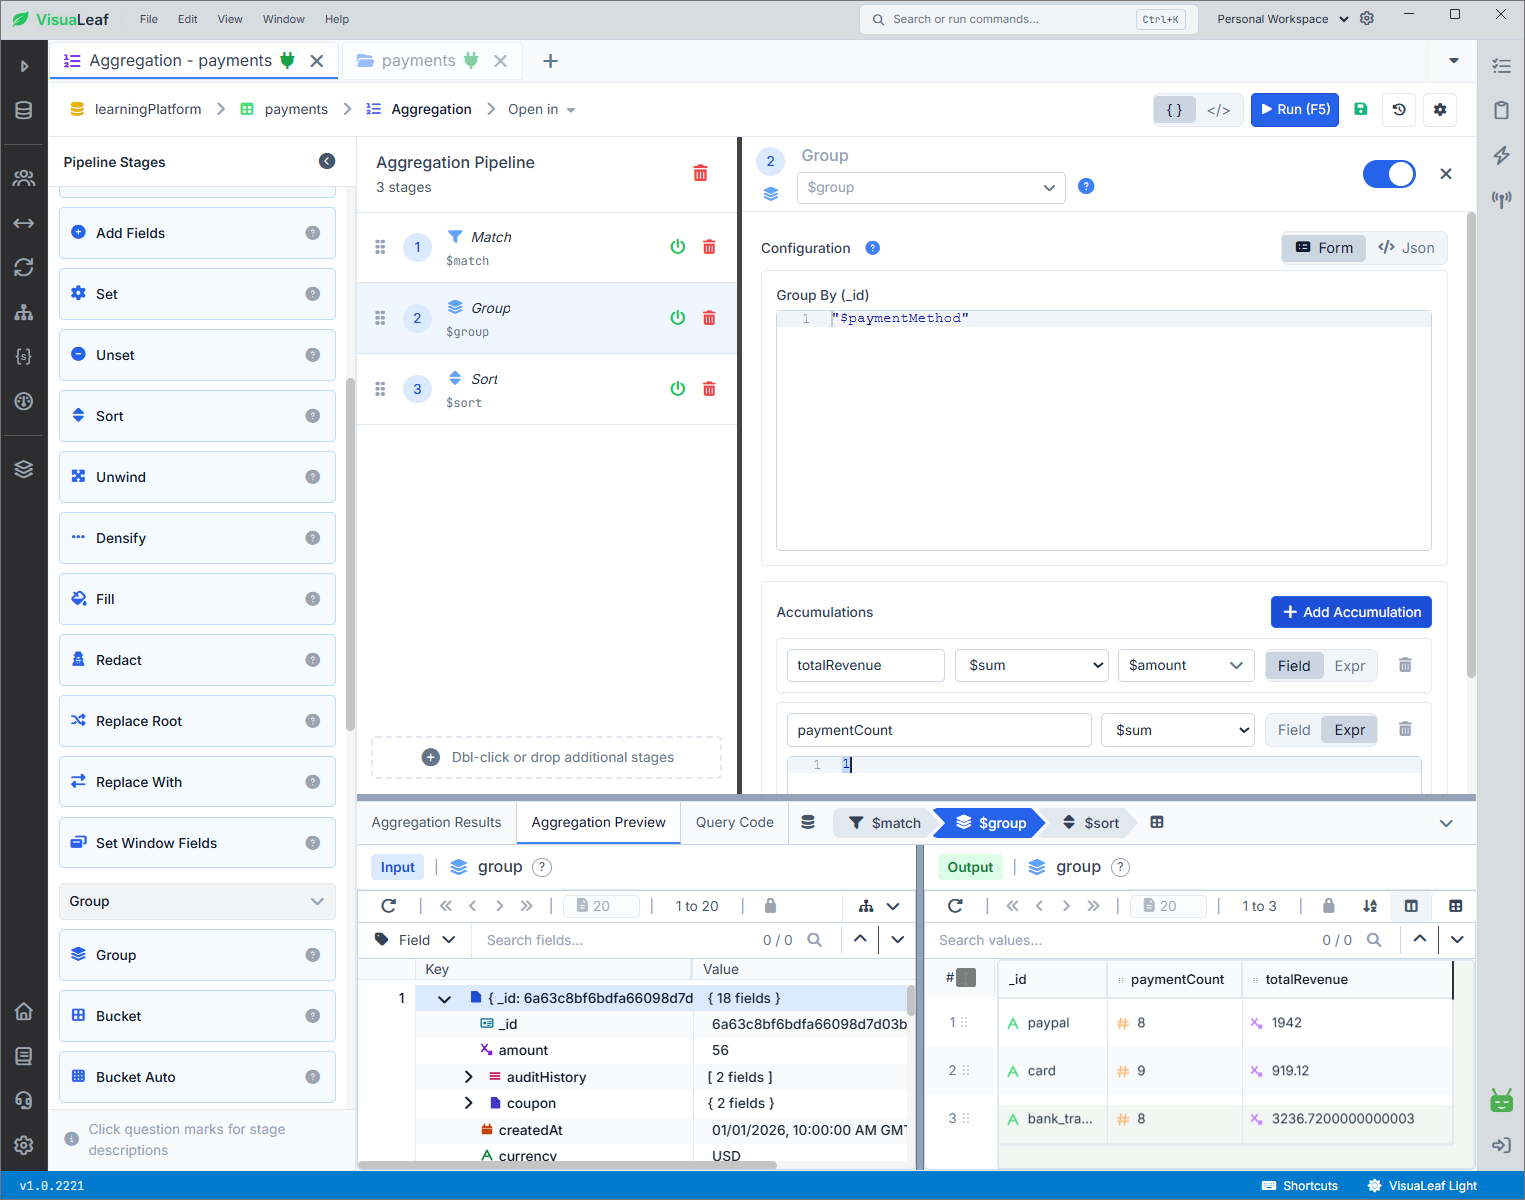
The visual builder does not replace knowing how MongoDB aggregation works. It simply makes longer pipelines easier to create, understand, and troubleshoot. When you need more control, you can continue working with MongoDB commands in the integrated shell.
Troubleshooting Unexpected Pipeline Results
An aggregation pipeline can run without returning an error and still produce the wrong result. These are some of the first things worth checking.
Confirm the field names
MongoDB field names are case-sensitive. customerId, customerID, and CustomerId are different fields.
Nested fields must also use the complete path:
{
  $match: {
    "customer.address.country": "England"
  }
}
Inspect a few real documents rather than relying only on your expected schema.
Check the data types
A number stored as a string will not behave like a numeric value. The same applies to dates stored as regular text.
For example, these values are not equivalent:
{ total: 150 }
{ total: "150" }
Use operators such as $type, $convert, $toDouble, or $toDate when data types are inconsistent. Before converting values, decide how the pipeline should handle invalid or missing data.
Inspect arrays carefully
Some operators behave differently when a field contains an array. $lookup also returns an array even when only one matching document exists.
If a pipeline suddenly produces more documents than expected, check whether $unwind is expanding an array. If documents disappear, review whether the field is missing or contains an empty array.
You can preserve documents without array values by using:
{
  $unwind: {
    path: "$items",
    preserveNullAndEmptyArrays: true
  }
}
Test joins separately
When $lookup returns an empty array, compare the values used by localField and foreignField.
A frequent cause is a type mismatch. An ObjectId will not match the same value stored as a string, even if they look similar when displayed.
Improve Aggregation Pipeline Performance
A correct pipeline is not automatically an efficient one. A query that works well with test data may slow down when the collection grows.
Use these practical checks before moving a pipeline into production:
- Place selective
$matchstages near the beginning. - Create indexes for fields frequently used in early filters and sorts.
- Remove fields you no longer need.
- Avoid unwinding large arrays earlier than necessary.
- Limit the number of documents passed into expensive stages.
- Review
$lookupoperations involving large collections. - Test the pipeline using realistic data volumes.
Use explain() to understand how MongoDB executes the pipeline:
db.orders.explain("executionStats").aggregate([
  {
    $match: {
      status: "completed"
    }
  },
  {
    $group: {
      _id: "$customerId",
      totalSpent: { $sum: "$total" }
    }
  }
])
Look at the number of documents examined, the number returned, and whether MongoDB uses an index or performs a collection scan.
Execution plans can be difficult to read when they become deeply nested. Tools such as VisuaLeaf can help by analyzing execution plans and highlighting possible performance issues, while its Query Profiler helps identify slow operations that may deserve further investigation.
Keep Complex Pipelines Maintainable
Aggregation pipelines often grow as application requirements change. A report that initially calculated monthly revenue may later need refunds, customer regions, product categories, and currency conversion.
To keep pipelines manageable:
- Give calculated fields clear names.
- Keep each stage focused on one transformation.
- Add comments when storing pipelines in application code.
- Test important stages with known input and expected output.
- Save reusable pipelines instead of rebuilding them.
- Review performance after changing filters, joins, or array operations.
When possible, keep the pipeline close to the application feature that uses it and track changes in version control. If a pipeline is shared across several services, document the expected input fields and output structure.
An AI assistant can help generate a starting pipeline or explain an unfamiliar stage, but always test the result against your real schema. Generated queries may make assumptions about field names, types, indexes, or relationships that do not match your database.
Choose the Right Way to Build Each Pipeline
There is no single best interface for every MongoDB task.
The MongoDB Shell is useful when you want full control, need to test JavaScript logic, or plan to move the pipeline directly into application code. A visual builder is helpful when you need to understand how documents change between stages or troubleshoot a long pipeline.
VisuaLeaf brings both approaches into one desktop application. You can build an aggregation visually, inspect documents and results side by side, analyze the schema, and then continue working in the integrated shell. Your database data remains on your machine, which is particularly useful when working with private development or production environments.
The important part is not choosing visual tools over code. It is using the clearest method for the task and being able to move between the two without rebuilding your work.
Build MongoDB Aggregations with Fewer Surprises
A MongoDB aggregation pipeline becomes much easier to manage when you treat it as a sequence of small, testable transformations. Start with a focused $match, add one stage at a time, and inspect the output before continuing.
Pay close attention to field names, data types, arrays, and join conditions. Once the results are correct, use execution statistics to check whether the pipeline will remain efficient as the collection grows.
The MongoDB Shell gives you complete control, while visual tools can make complex pipelines easier to follow and troubleshoot. If you regularly switch between document browsing, pipeline creation, schema inspection, and performance analysis, you can explore VisuaLeaf as one way to keep those tasks in a single workspace.