How to Build MongoDB Aggregation Pipelines Visually
Learn how MongoDB aggregation pipelines work step by step, with clear examples and visual explanations.


A MongoDB aggregation pipeline lets you process data step by step.
Instead of writing one huge query, you build a sequence of small steps, and each one changes the result a little more.
When you first encounter an aggregation query, it often looks something like this:
db.enrollments.aggregate([
  { $match: { status: "active" } },

  { $group: { id: "$courseId", enrollmentsCount: { $sum: 1 } } },

  { $lookup: { from: "courses", localField: "id", foreignField: "id", as: "course" } },

  { $unwind: "$course" },

  { $project: { courseTitle: "$course.title", enrollmentsCount: 1, id: 0 } },

  { $sort: { enrollmentsCount: -1 } },

  { $limit: 5 }
])
If you are new to aggregation pipelines, a query like this can feel hard to follow at first.
When the same logic is built visually, it becomes much easier to understand because you can see how the result changes step by step.
A simple way to think about it is like this:
documents → filter → group → join→ shape → sort → result
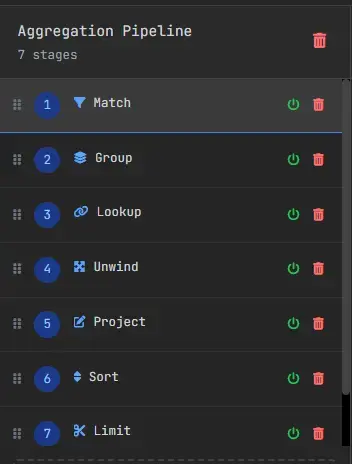
Here is the same pipeline built easily in VisuaLeaf.
Instead of typing the full query from the start, you can add each step from the interface and see the logic more clearly.
In the next two examples, we will build two pipelines step by step:
- one that counts active enrollments for each course
- one that shows recent payments together with course details
These examples use stages you will see often in real MongoDB work:$match, $group, $lookup, $unwind, $project, $sort, $limit.
Rather than looking only at the syntax, we will use a visual builder so it is easier to see what each step does to the data.
If you prefer a visual explanation, I also created a step-by-step video where I build the same aggregation pipeline:
Learn How to Build MongoDB Aggregation Pipelines Fast
I. MongoDB Aggregation Pipeline Example: Active Enrollments per Course
Let’s start with a simple question:
Which courses currently have the most active enrollments?
Instead of writing the whole query manually, we can build it one step at a time and watch how the result changes.
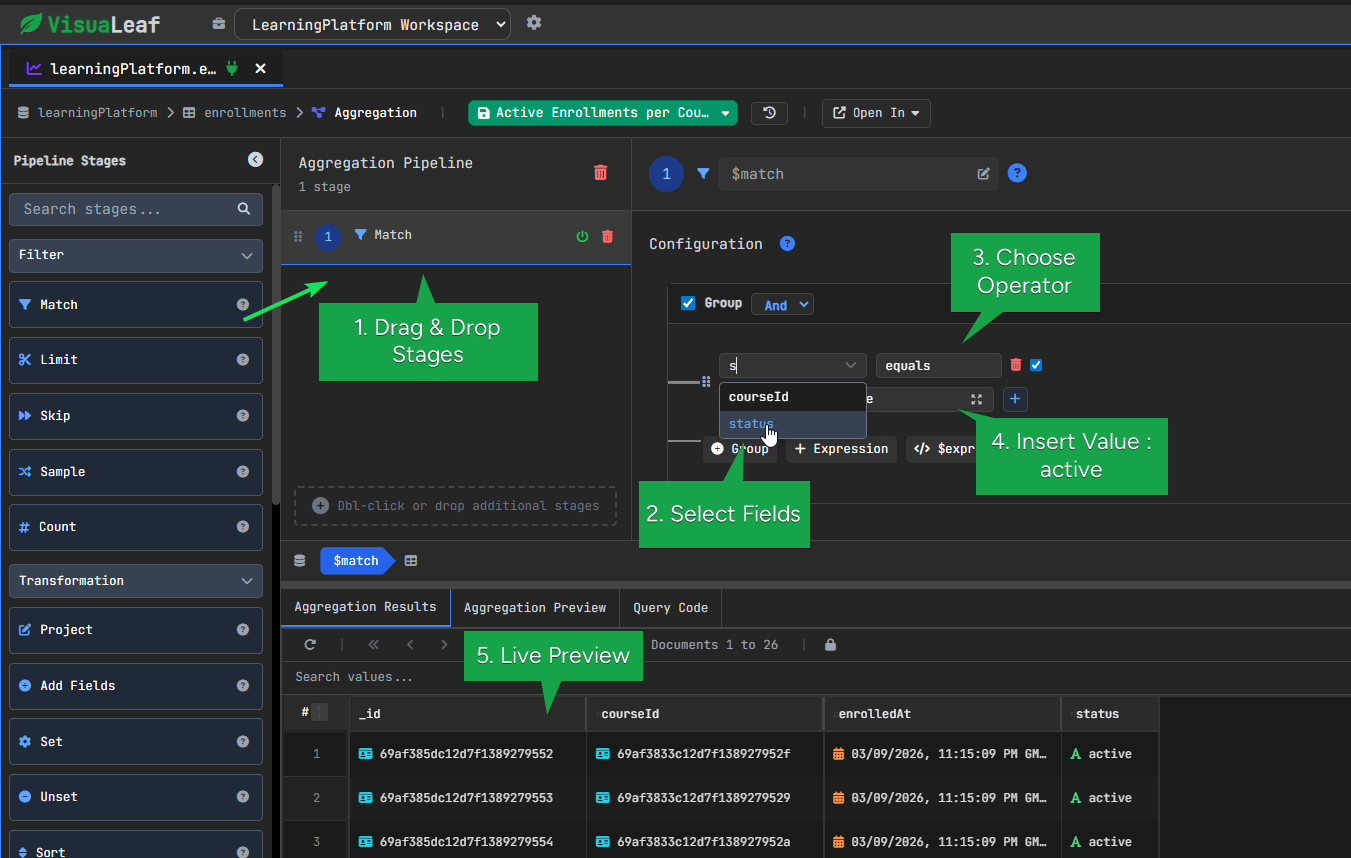
1. MongoDB $match Stage – Filtering Documents
We start by keeping only the enrollments that are still active.
This removes the documents we do not need and makes the rest of the pipeline more focused.
Configuration example:
- Choose Field: status
- Insert Value: active
After this step, the pipeline contains only active enrollments.
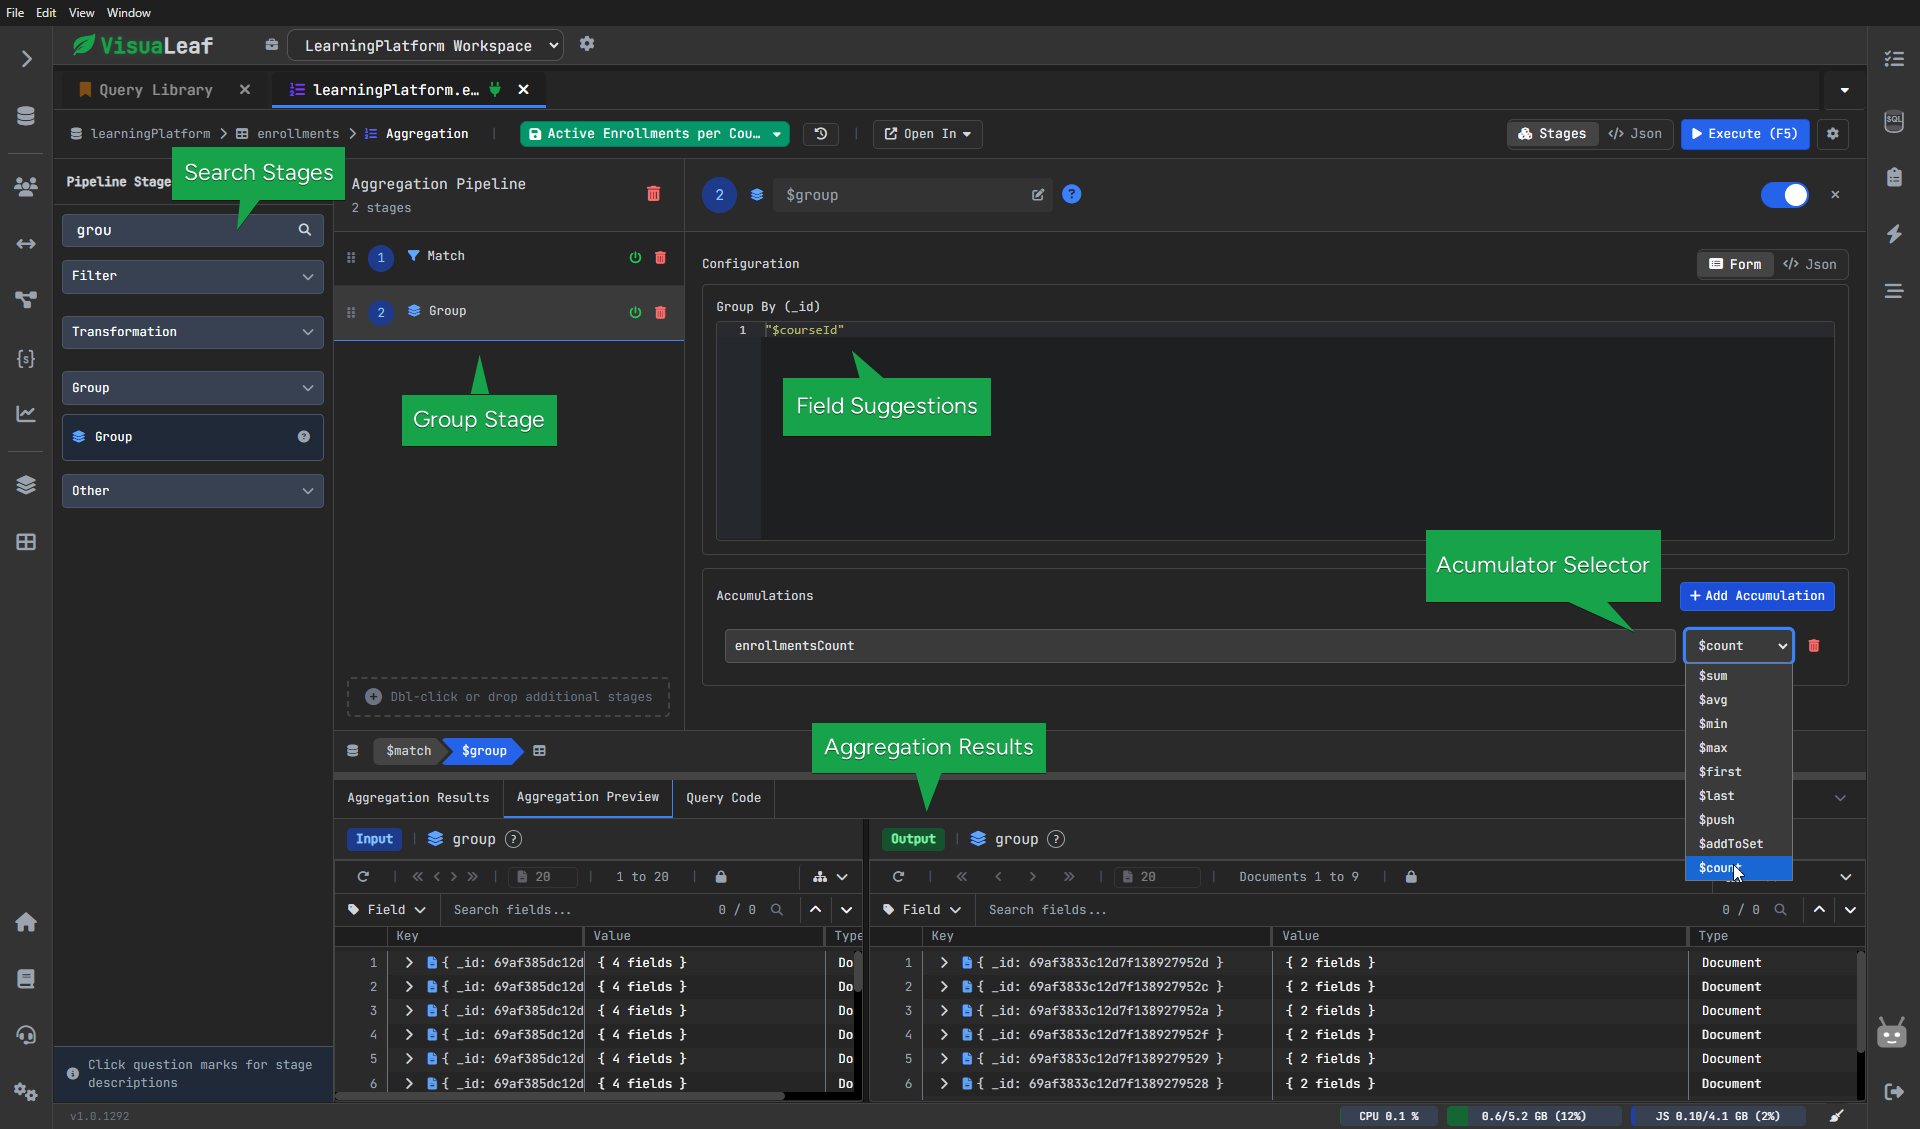
2. MongoDB $group Stage - Aggregating Data
Now we group those enrollments by course and count how many belong to each one.
Configuration:
- Group By: courseId
- New Field: enrollmentsCount
- Operation: count
Before this step, each document represented one enrollment.
After it, each document represents one course together with its enrollment count.
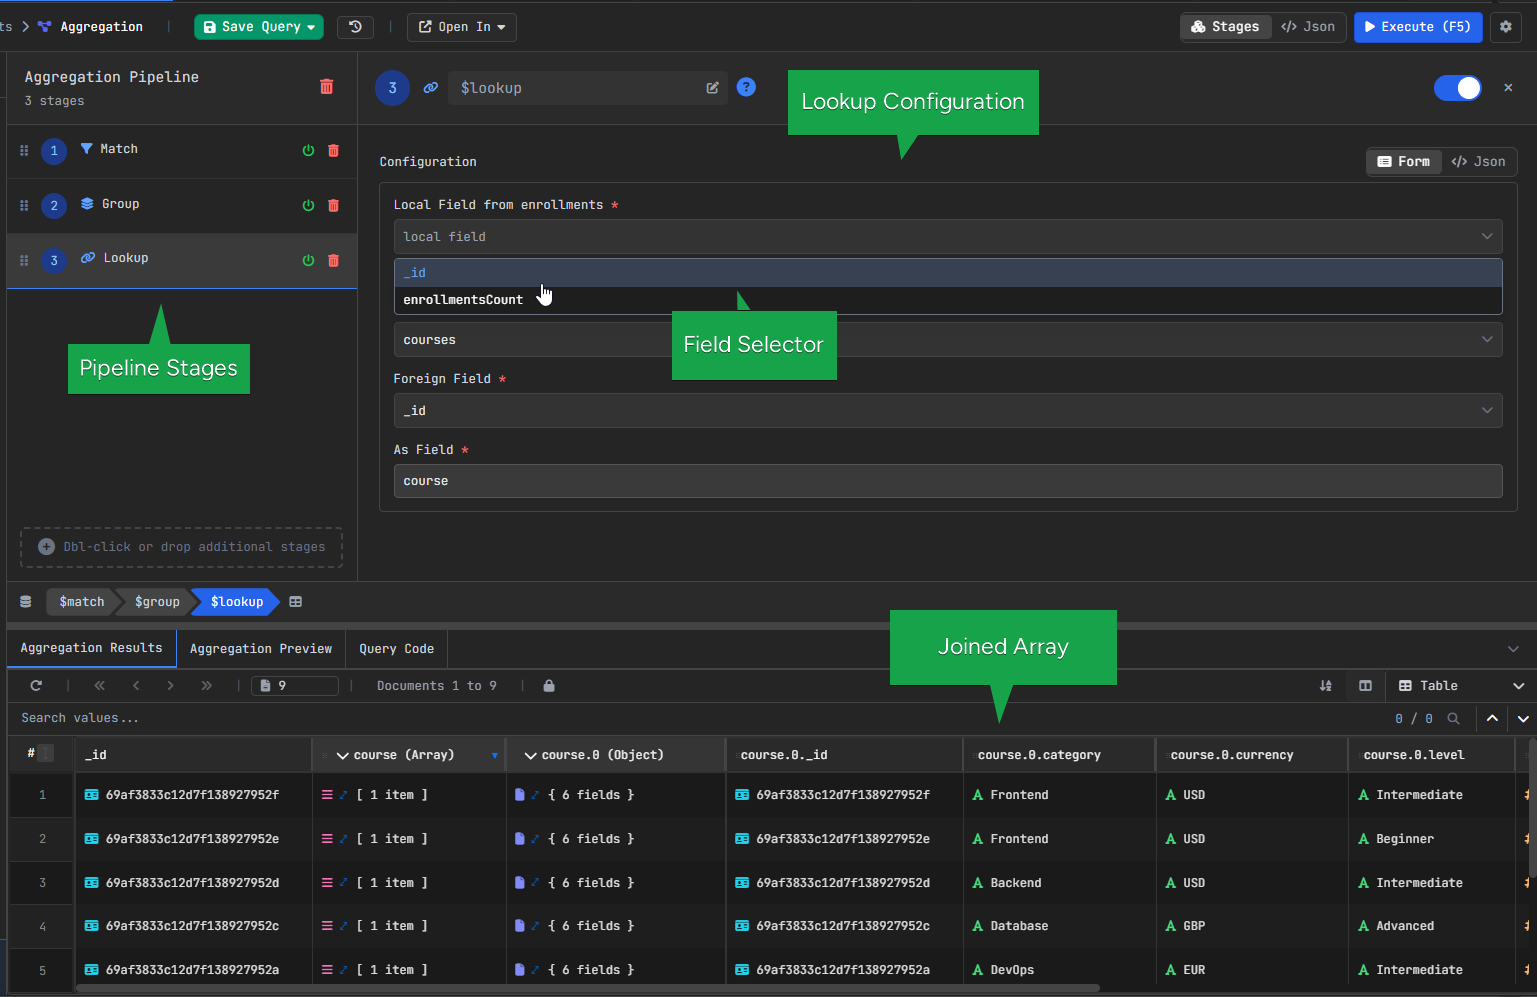
3. MongoDB $lookup Stage – Joining Collections
At this point, we know how many enrollments each course has, but we still only have the course ID.
To bring in the course details, we use $lookup, which joins the courses collection.
Configuration:
In VisuaLeaf, these fields can be selected visually from the interface:
- From collection: courses
- Local field: _id
- Foreign field: _id
- As: course
After this step, each result also contains the matching course document.
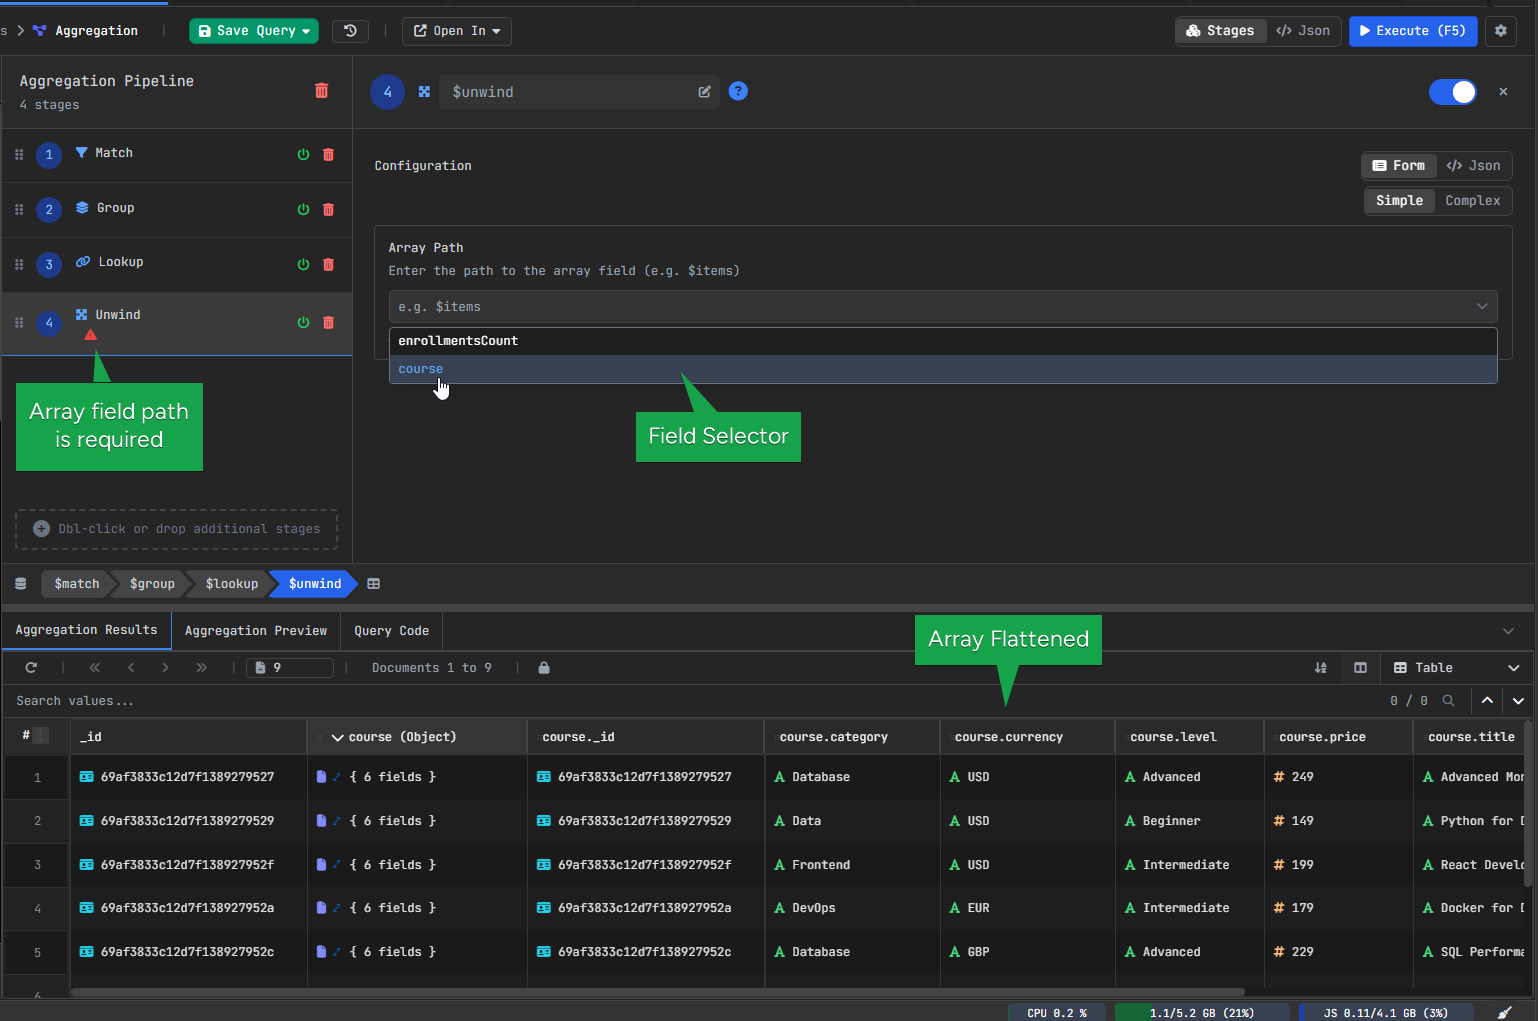
4. MongoDB $unwind Stage – Flattening Arrays
After $lookup, the course data is stored as an array.
Since we want to work with the course fields directly, we use $unwind to flatten that array.
Configuration:
- Field: course
After that, the course data is no longer wrapped in an array, so fields like course.title are easier to use.
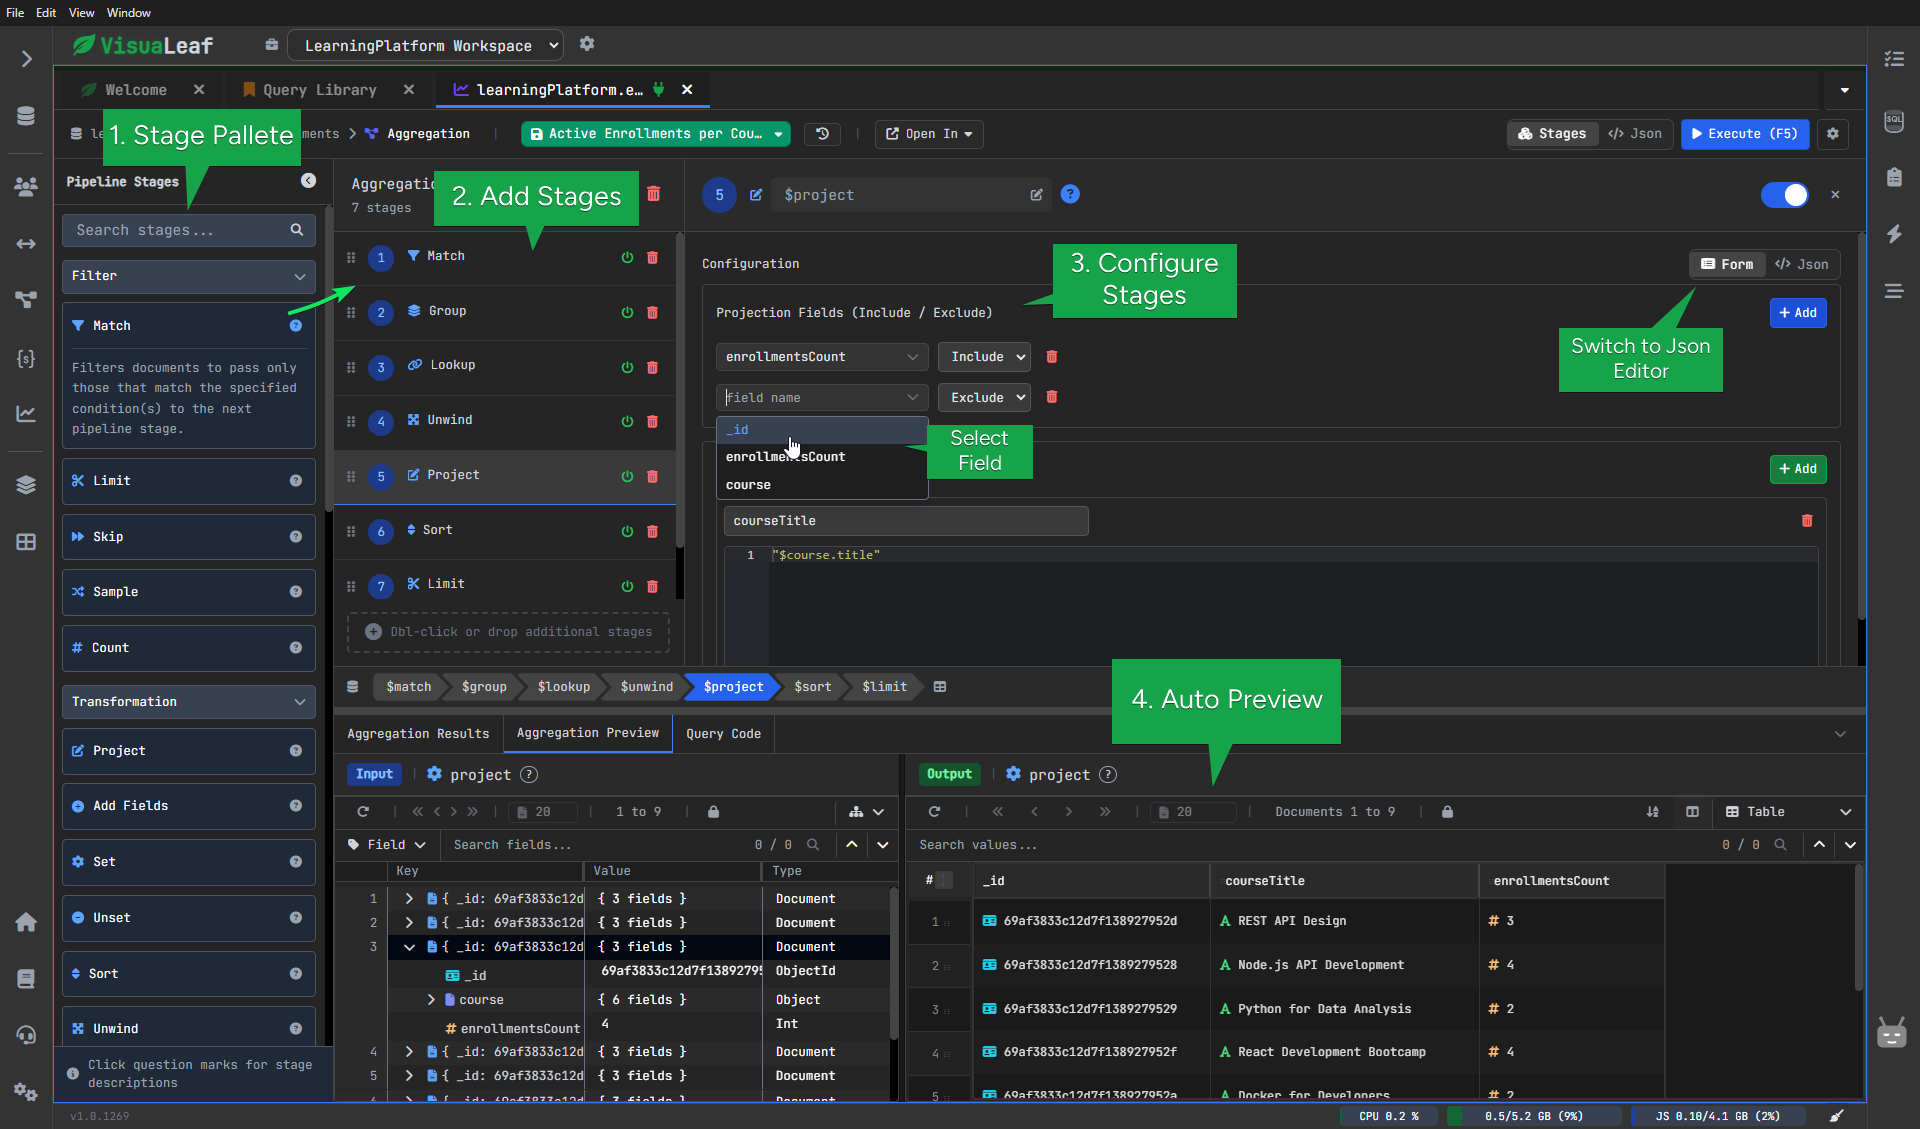
5. MongoDB $project Stage – Formatting the Output
Now we clean up the result with $project.
This is the step where we choose what the final output should look like.
Configuration:
Include:
- courseTitle
- enrollmentsCount
Exclude:
- _id
Computed field:
- courseTitle → course.title
Here we keep only the fields we want to show and create a clearer field name for the course title.
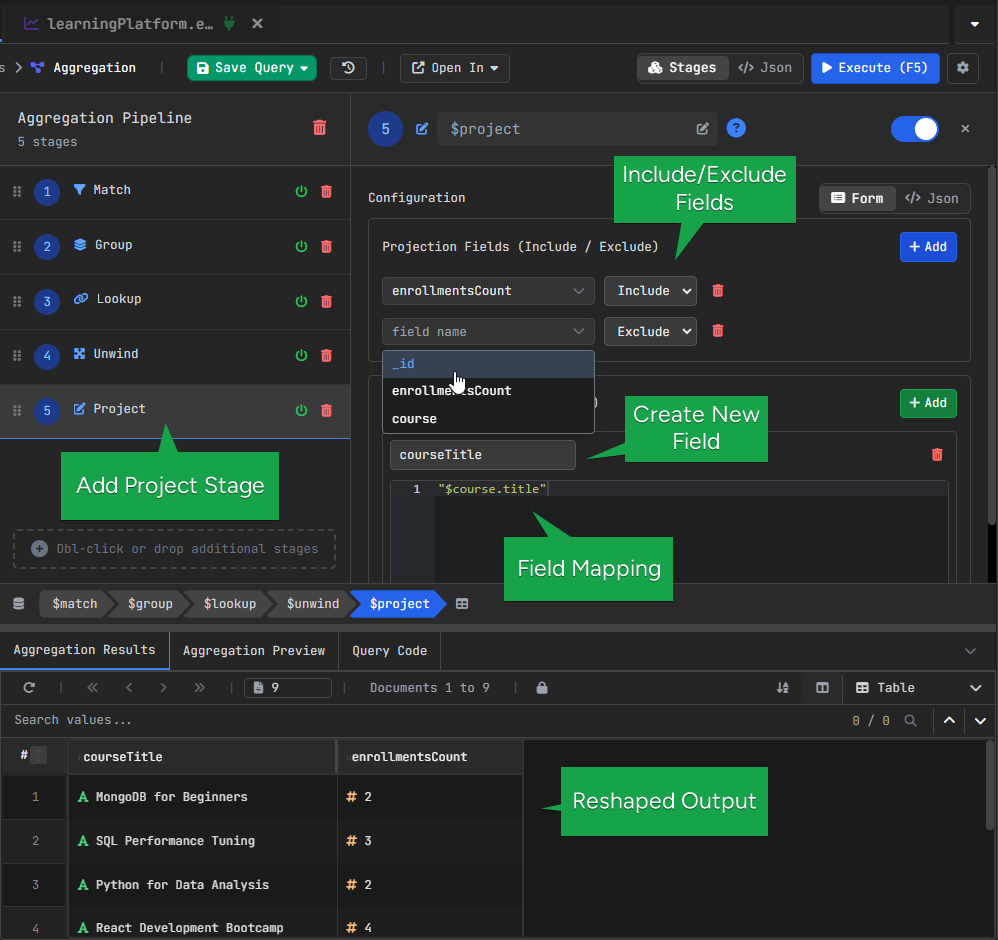
courseTitle from course.title.6. MongoDB $sort Stage – Ordering Results
Once the result has the right fields, we sort it so the courses with the highest enrollment count appear first.
At this point, we want the most popular courses to appear first, so we sort by enrollmentsCount in descending order.
Configuration:
- Field: enrollmentsCount
- Order: Descending
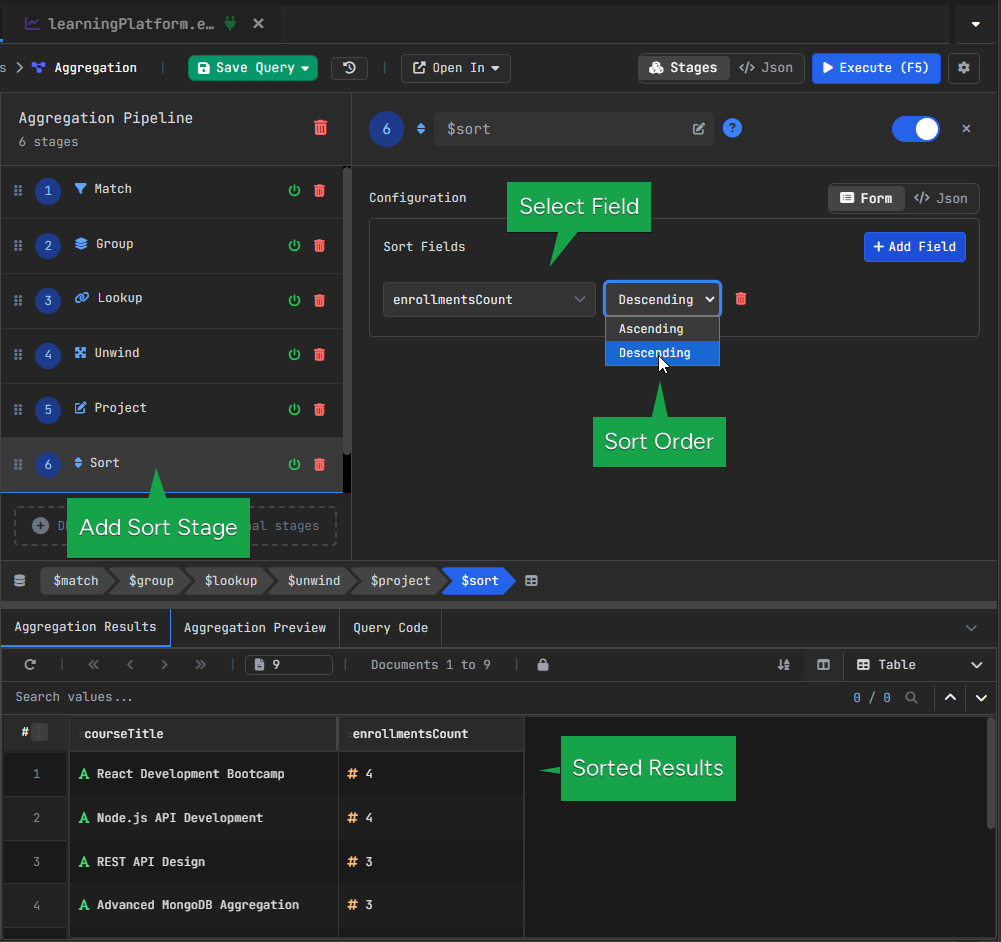
$sort to order courses by enrollmentsCount, displaying the most popular courses first.7. MongoDB $limit Stage – Restricting Results
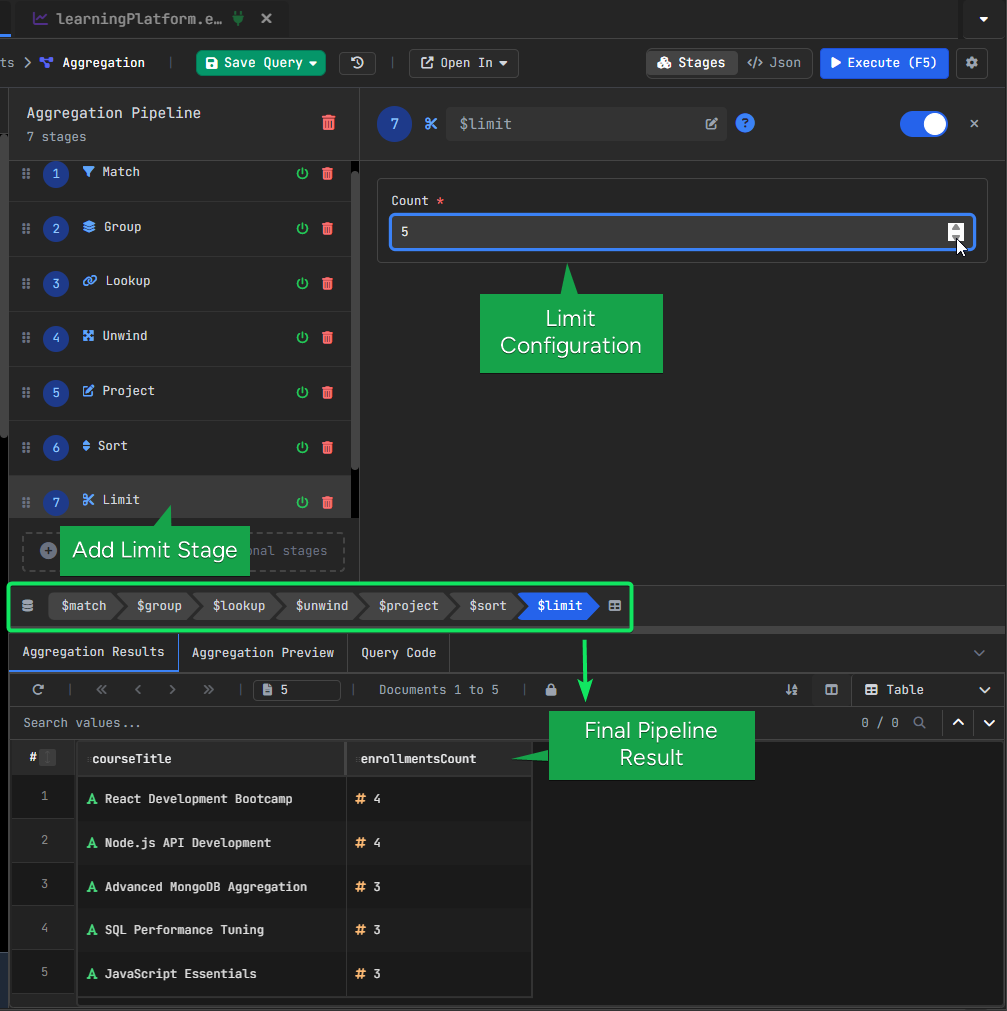
Finally, we keep only the first 5 results.
Configuration:
- Limit: 5
At this point, we have the top 5 courses with the most active enrollments.
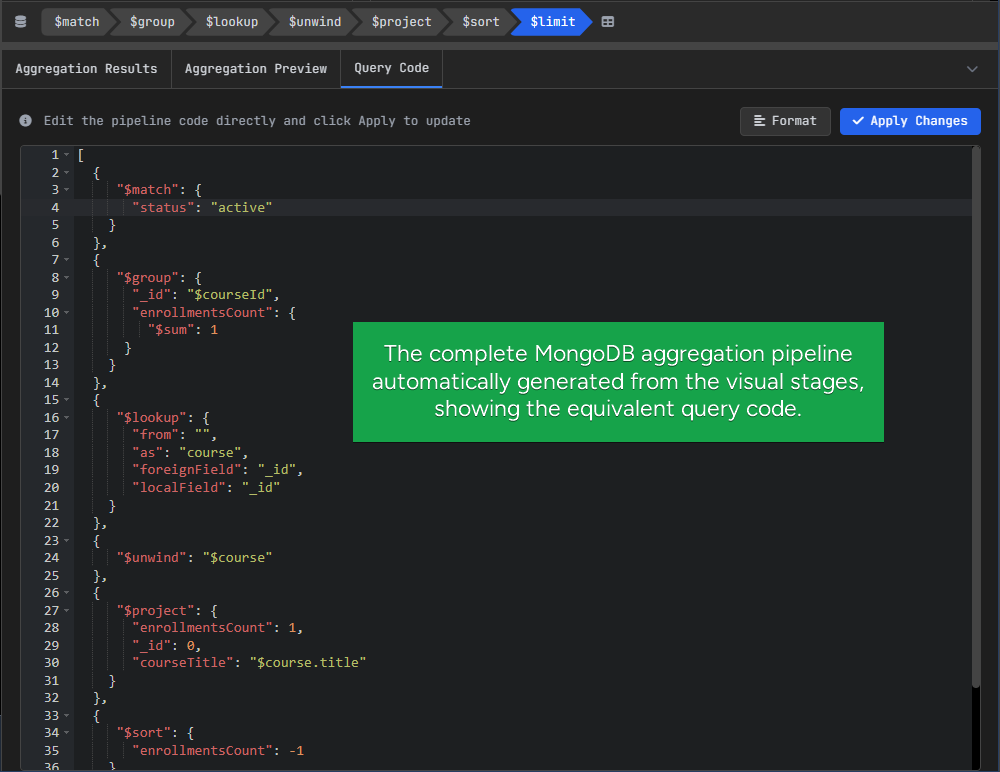
Generated MongoDB Aggregation Query
The pipeline built in the visual editor is also generated as MongoDB query code.
This makes it easier to understand how the visual steps translate into actual syntax.
You can also edit the generated query directly, which is useful if you want to test small changes or copy the pipeline into your application.
So the visual builder helps you create the pipeline more easily, while the generated code helps you learn the MongoDB syntax behind it.
II. MongoDB Aggregation Pipeline Optimization: Reduce Data Early
The first example was about understanding the logic of a pipeline.
This second example shows something just as important: the order of the steps can also affect performance.
A good rule is to reduce the number of documents as early as possible, and only then join extra information.
That way, expensive steps like $lookup only run on a smaller set of documents.
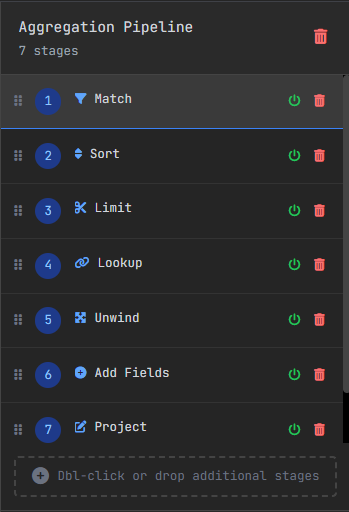
I. Reduce Documents Early with $match, $sort, and $limit
We start with $match, which keeps only the payments made in USD. Then $sort places the newest payments first, and $limit keeps only the most recent ones.
This is an important optimization idea. By reducing the number of documents early, the next stages have less data to process.
II. Join Related Data with $lookup and $unwind
Once the dataset is smaller, $lookup brings in the related course document.
After that, $unwind flattens the joined array so the course fields are easier to access.
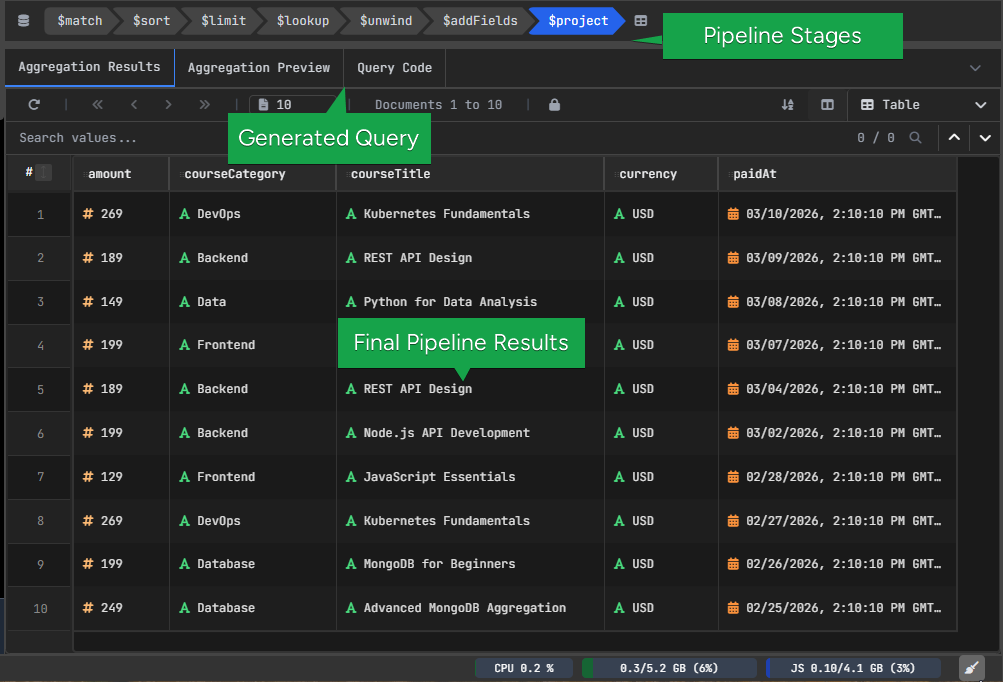
At this point, the pipeline contains both the payment data and the course details.
III. Format the Output with $addFields and $project
The last steps shape the final result.$addFields extracts the course category into a simpler field, and $project keeps only the fields we want to show.
This makes the final output cleaner and easier to read.
Key idea
The main lesson here is that pipeline order matters.
A practical aggregation flow often looks like this:
- use
$matchto filter early - use
$sortand$limitto reduce the dataset - use
$lookuponly after the dataset is smaller - use
$projectto clean up the final output
This pattern is much easier to understand in a visual builder, because you can see how each step changes the result.
How to Build MongoDB Aggregation Pipelines Visually
If you want to experiment with these aggregation pipelines yourself, you can try them directly in VisuaLeaf.
The web demo playground lets you build aggregation pipelines visually, run them, and inspect the generated MongoDB query.
Try it here: Demo Playground VisuaLeaf
Learn More About MongoDB Aggregation Pipelines
These resources explain the concepts and stages in more detail:
- Best MongoDB Aggregation Tools in 2026
- MongoDB Documentation – Aggregation Pipeline
https://www.mongodb.com/docs/manual/core/aggregation-pipeline/ - MongoDB Aggregation Stages Reference
https://www.mongodb.com/docs/manual/reference/operator/aggregation/ - W3Schools – MongoDB Aggregation Tutorial
https://www.w3schools.com/mongodb/mongodb_aggregations_intro.php